Downloading the Graphtec Pro Studio for Windows OS
This software is application software for creating original design on the Windows. It sends the cutting object to the Graphtec cutting plotter, and can also control the plotter.
Note: If Graphtec Pro Studio / Plus is used on Windows 7, it should be in Ver.2.90.
Note: If you are using FC8000 series, please use Ver2.21.
Note: If you are using CE5000 series, please use Ver2.10.
About using Graphtec Pro Studio
The Graphtec Pro Studio is the graphics design application software for Graphtec cutting plotter. It is required to activate the Graphtec Pro Studio software after it is installed by the activation code that is attached with the cutting plotter. Please refer the document for installing the software.
About using Graphtec Pro Studio Plus (optional software)
The Graphtec Pro Studio is an enhanced edition of Graphtec Pro Studio. It has additional functions for improving productivity and creating advanced design. It is required to activate and upgrade the software by the purchased activation code after the Graphtec Pro Studio is installed. Please refer the document for installing the software.
About customer registration to Graphtec
Please register the Graphtec Pro Studio Plus. Support informatiom such as newsletters of products and information will be provided.
Customer Registration Form >
Software License Agreement
It is required to review the following license agreement before the software is downloaded. We will be deemed that the customer has to agree to the terms and conditions of the license agreement when the software had been downloaded by the customer. Please note that it is not possible to download or use the software if the customer does not agree to it.
Downloading Files
Ver.3.40 (Latest version)
Note: If Graphtec Pro Studio / Plus is used on Windows 7, it should be in Ver.2.90.
Note: If you are using FC8000 series, please use Ver2.21.
Note: If you are using CE5000 series, please use Ver2.10.
Ver.2.90
Note: If you are using FC8000 series, please use Ver2.21.
Note: If you are using CE5000 series, please use Ver2.10.
Ver.2.21
Note: If you are using CE5000 series, please use Ver2.10.
Ver.2.10
| Date of updated | 29 Jan, 2018 | ||
| Supported Products (*2) | CE LITE-50 / CE6000 Plus series / FC8600 series / CE6000 series / FC8000 series / CE5000 series FCX4000 series / FCX2000 series / FC4500 series / FC2250 series | ||
| Supported OS (*1) | Windows 10 / Windows 10 64-bit edition | Home / Pro / Enterprise / Education | |
| Windows 8.1 / Windows 8.1 64-bit edition | Windows 8.1 / Pro / Enterprise | ||
| Windows 8 / Windows 8 64-bit edition | Windows 8 / Pro / Enterprise | ||
| Windows 7 / Windows 7 64-bit edition | Ultimate / Enterprise / Professional / Home Premium | ||
| System requirements | Processor | Intel Core i3 or higher | |
| RAM | 8GB or more | ||
| Install space needed | 10GB or more | ||
| Video | 1152 × 854 (at least), 16 bit color or more | ||
| Downloading files | Software | GPS_V210.zip (563,941KB) | |
| How to install, activate the Graphtec Pro Studio or Graphtec Pro Studio Plus | Chinese | GPS_GPSPlus_CM4_SetupManual(ed.2)_CHN.pdf (1,836KB) | |
| German | GPS_GPSPlus_CM4_SetupManual(ed.2)_DEU.pdf (2,173KB) | ||
| English | GPS_GPSPlus_CM4_SetupManual(ed.3)_ENG.pdf (1,873KB) | ||
| Spanish | GPS_GPSPlus_CM4_SetupManual(ed.2)_ESP.pdf (2,116KB) | ||
| French | GPS_GPSPlus_CM4_SetupManual(ed.2)_FRA.pdf (2,135KB) | ||
| Italian | GPS_GPSPlus_CM4_SetupManual(ed.2)_ITA.pdf (2,088KB) | ||
| Korean | GPS_GPSPlus_CM4_SetupManual(ed.2)_KOR.pdf (2,313KB) | ||
| Portuguese | GPS_GPSPlus_CM4_SetupManual(ed.2)_PRT.pdf (2,092KB) | ||
| Russian | GPS_GPSPlus_CM4_SetupManual(ed.2)_RUS.pdf (2,109KB) | ||
* Graphtec does not support software used with operating systems that have become obsolete and are no longer supported by the OS developer. (*1) On software, it is run in the WOW64 mode (32-bit emulation mode) when the 64-bits Windows OS is used. (*2) The firmware needs to be the follwong version.
• FCX2000 series: version 1.20 or later
• FC4500 series: version 1.92 or later
• FC2250 series: version 3.90 or later
• FC8600 series: version 1.11 or later
• FC8000 series: version 3.01 or later
• CE6000 series: version 1.20 or later
• CE5000 series (Current firmware is version 5.00 or later): version 6.10 or later
• CE5000 series (Current firmware is previous of version 3.80): version 3.80 or later
Revision History
Ver.3.40
Update: 26 May, 2021
Ver.3.30
Update: 16 Dec, 2020
Ver.3.20
Ver.3.10
Ver.3.00
Update: 24 Jun, 2020
Ver.2.90
Update: 12 Nov, 2019
Ver.2.42
Update: 12 Jun, 2019
Ver.2.40
Update: 13 Mar, 2019
Ver.2.30
Ver.2.21
Update: 28 Jun, 2018
Ver.2.10
Update: 29 Jan, 2018
Ver.1.80
Update: 16 Jan, 2018
Ver.1.70
Update: 29 Sep, 2017
Ver.1.50
Ver.1.40
Update: 12 Apr, 2017
SOFTWARE > GRAPHTEC PRO STUDIO FOR WINDOWS
SOFTWARE LICENSE AGREEMENT
FOR WINDOWS V.2.42 (LASTEST VERSION)
The Graphtec Pro Studio is the graphics design application software for Graphtec cutting plotter. It is required to activate the Graphtec Pro Studio software after it is installed by the activation code that is attached with the cutting plotter. Please refer the document for installing the software
It is required to review the following license agreement before the software is downloaded. License Agreement in pdf (123 KB) >> Download
| Date of updated | June 12, 2019 | |
| Supported Products (*2) | CE LITE-50 / CE6000 Plus series / FC8600 series / CE6000 series / FC8000 series / CE5000 series FCX4000 series / FCX2000 series / FC4500 series / FC2250 series | |
| Supported OS (*1)(*3) | Windows 10 / Windows 10 x64 Edition | Home / Pro / Enterprise / Education |
| Windows 8.1 / Windows 8.1 x64 Edition | Windows 8.1 / Pro / Enterprise | |
| Windows 8 / Windows 8 x64 Edition | Windows 8 / Pro / Enterprise | |
| Windows 7 / Windows 7 x64 Edition | Ultimate / Enterprise / Professional / Home Premium / Home Basic | |
| Recommended system requirements | Processor | Intel Core i3 or higher |
| RAM | 8GB or more | |
| install space needed | 10GB or more | |
| Video | 1152 × 854 (at least), 16 bit color or more | |
(*1) On software, it is run in the WOW64 mode (32-bit emulation mode) when the 64-bits Windows OS is used.
(*2) The firmware needs to be the follwong version.
▪ FCX2000 series: version 1.20 or later
▪ FC4500 series: version 1.92 or later
▪ FC2250 series: version 3.90 or later
▪ FC8600 series: version 1.11 or later
▪ FC8000 series: version 3.01 or later
▪ CE6000 series: version 1.20 or later
▪ CE5000 series: version 3.80 to version 4.90
▪ CE5000 series: version 6.10 or later
(*3) The cutting conditions specified by this software will not be effective unless setting is changed on the operation panel of cutting plotter when using the following models.
CE6000Plus and CE6000 series
Change the setting of CONDITION PRIORITY from MANUAL to PROGRAM in the TOOLS SETTING menu.
CE5000 series
Change the setting of PRIORITY from the MANUAL to COMD in the special function setting menu.
REVISION HISTORY
Ver.2.42
Update: June 12, 2019
Fixed the problem that an off scale error occurs when using the bigger data than the chosen media size from the General tab.
Fixed the problem that media size not being recognized from the General tab when using Simple mode. (CE6000/CE6000 Plus)
Ver.2.40
Update: Mar. 13, 2019
Fixed the problem that some circular arc shapes may be reversed when opening the GSD file.
Fixed the problem that some objects may be not displayed when opening the GSD file.
Fixed the problem that orientation of some texts may be not displayed correctly when opening the DXF file.
Fixed the problem that it may occur the off scale error when the Fit to media on General tab of Cut/Plot menu is enabled.
Fixed the problem that the color tone may change when using specific AI file.
Fixed the problem that the maximum media width of the FC8600 and FC8000 series could not be set in the Media Width column on the General tab of Cut/Plot menu.
Fixed the problem that some curve immediately before plotter is stop may not be cut when the Pause on Option tab of Cut/Plot menu is enabled.
Ver.2.30
Corresponded the following two new editions of Graphtec Pro Studio Plus.
・Graphtec Pro Studio Plus for Rhinestone
・Graphtec Pro Studio Plus for Auto Nesting
* In order to use these editions, it is required to purchase a dedicated activation code.
Fixed the problem that exclusive control may be automatically canceled in 15 minutes before the cutter status returned to ready when the cutter was connected to the network and the cut job was executed.
Fixed the problem that nesting may be done without rotating when executing by the True Shape Nest with grouped data in Graphtec Pro Studio Plus.
Added a function that indicating the upper limit of panel size that can use in the True Shape Nest in Graphtec Pro Studio Plus.
Fixed the problem that graphics may not be duplicated or nested when Smart nest was executed in Graphtec Pro Studio Plus.
Fixed the problem that an error message may be displayed when specifying the By layer on the Cut/Plot menu after executing Rhinestone fill in Graphtec Pro Studio Plus.
Added a function to automatically use the same font type when opening GSD or GSP file containing text data.
Fixed the problem that certain holes may not be recognized when Auto-weld and Weld were executed.
Ver.2.10
Update: Jan 28, 2018
Corresponded to CE LITE-50.
Added a function to specify the color of registration mark line and the color of paint around mark. (A model that supporting color mark: CE LITE-50)
Added a function to import SVG file. (*1)
Added a function to import ROBO Master file (GSD, GST, GSP format). (*2)
Fixed the problem that registration mark location may not be correct after opening file that contain mark created using Cutting Master 4 in certain condition.
Fixed the problem that direction of shape may not be correct when copy is enabled by Copies setting on General tab with certain condition.。
Fixed the problem that an error message may appear after clicking Send button when shape is filled by Pattern fill or Gradient fill.
Fixed the problem that it may lose the response when an incorrect USB port is specified for adding a cutter.
Fixed the problem that part of image may not printed after editing imported PNG file in certain condition.
Fixed the problem that it may lose response of screen after certain operation is executed using Auto tile and smart nest on General tab in the Graphtec Pro Studio Plus.
Changed an action when size of job is changed using spin button on Job size setting area in General tab.
Fixed the problem that setting parameter limitation is incorrect on Mark Length setting in Graphtec Mark Options window.
(*1) Restricted items in using SVG file
• When the SVG file containing registration marks is imported for print and cut application, it is required to specify or add contour cutting line.
• When editing contents in the imported SVG file, it is required to ungroup contents.
• Font size of text included in the SVG file are not reproduced. It is recommended that converting the font to outline before creating the SVG file.
• Following elements contained in the SVG file may not be reproduced correctly. Gradation, Transparent, Pattern, Image, Layer
• The SVG files created under the following conditions can not be used.
— When registration marks are contained in the SVG file, the SVG file is created by an application that is different from the application created the register marks.
— The SVG file is created by the Export function. It is required to create the SVG file using Save As on File menu.
(*2) Restricted items in using file created by ROBO Master (file type: GSD, GST, GSP)
• When the RBO Master file containing registration marks is imported for print and cut application, it is required to specify or add contour cutting line.
• When editing contents in the imported RONBO Master file, it is required to ungroup contents.
• When text is included in the ROBO Master file, it is necessary to select the font used when creating file with ROBO Master after the font selection window appears. The contour of the text created by Robo Master may not match the characters displayed on the screen, even if the same font is selected.
• Following elements contained in the SROBO Master file may not be reproduced correctly.
Gradation, Transparent, Pattern, Image, Layer, Font.
Ver.1.80
Update: 16 Jan, 2018
Corresponded to FCX4000.
Ver.1.70
Update: 29 Sep, 2017
Changed the settings of copy space in the matrix copy because the registration mark cannot be detected correctly when the copy space is set to zero.
Fixed the problem that the settings of Force or Acceleration in all conditions settings of cutter may changed when the Force or Acceleration is set in software.
Fixed the problem that cutting may not be performed when Panel to border is set.
Improved the Smart nest that can hold the split position.
V.1.50, Update: June 2, 2017
Fixed the problem that the arrangement position of the bar code may shift when creating a register mark of type 2 and length of register mark to be shorter than 20 mm.
Fixed the problem that the disabling the color or layer on settings of Option tab may not be reflected in the preview. (Cutting condition setting for each layer is supported only by Graphtec Pro Studio Plus.)
Ver.1.40, Update: Apr. 12, 2017
Fixed the problem that the Barcode Link Info may not be displayed on the design screen when a bar code is created in the European language OS.
Fixed the problem that the existing cutting condition may be deleted when saving the cut condition with the Before Job tab.
Fixed the problem that the bottom right corner message may be displayed when cutting data included the registration mark is transferred to the flat type cutter.
Fixed the problem that it may not be reflected on the preview screen when the Panel to border is disabled.
Fixed the problem that setting value of Panel Margin may be changed when the Job Scale is changed after the Panel Margin is set.
Fixed the problem that the coordinates of tile may be displayed on the Save to file button of the XPF file.
SUPPORT > FAQ > INSTALLING GRAPHTEC PRO STUDIO
INSTALLING GRAPHTEC PRO STUDIO
STEP 1: SET UP

Perform the user registration to «SAi Cloud». To install Graphtec Pro Studio, you must perform the user registration to SAi’s Sai Cloud and then enable the activation code of Graphtec Pro Studio.
STEP 1:
Start the browser from your computer, enter www.saicloud.com. The following screen is displayed. You can change the display language by selecting the language at the bottom of the screen.

STEP 2:
Enter the activation code of Graphtec Pro studio, click on [Activate] button.

STEP 3:
Select «I am new to the SAi Cloud», Enter your email address for product registration, then click [Create Account] button.
* If you already had Said account, select «Account has been registered». Enter your email and password to log in, then go to step 8.

STEP 4:
This screen switches to the screen asking for confirmation of received email.

STEP 5:
Open the email sent to your SAi register email, and access to the provided URL.

STEP 6:
Enter necessary information, The «*» Asterisk indicates the mandatory field. Then click [Create Account] button

STEP 7:
Click [I accept the terms and conditions] button.

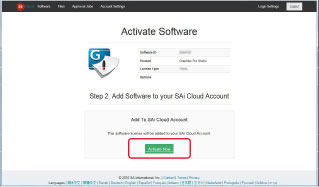
STEP 8:
Click [Activate Now] button.
STEP 9:
Activation is complete. Now, the user registration to «SAi Cloud» is complete.

STEP 2: INSTALLATION

To install Graphtec Pro Studio, you must enable the activation code before installing it.
STEP 1:
Insert DVD, or download Graphtec Pro studio. Click on [Setup Graphtec Pro Studio] button from «Start» screen.
Note: when downloaded from our website, double-click on «Autorun.exe».
Click on «Step1-Download»-«Download now» displayed in step 10 of the SAi Cloud User Registration, then download the «Saint_Software_Download.exe».
You can download Graphtec Pro Studio by executing the downloaded «SAi_Software_Download.exe». Even if you downloaded it in this way, double click on the «Autorun.exe».

STEP 2:
Click on [Browse] button if you want to change destination folder, then click [Next] button.
Graphtec pro studio код активации

резать из меловки.
Из того, что разобрался:
В кореле открывается кьютмастер как вырезать понятно. С линиями по цветам тоже понял. Но при резке он макет располагает не так как на листе, а в углу. Есть там плагин с расстановкой меток, тут тоже понятно. С метками и печатет. Метки плоттер вроде как находит, но как запустить печать по этим меткам вообще не понял.
В программе Graphtec Pro Studio вообще не нашел как поставить метки.
Третий год трудится у нас камео. Думал разберусь по анологии и не получилось.
Сейчас вот стоит мой 6000 и как пользоваться не знаю.
Помогите если не советом, то может ПЛАТНОЙ консультацией.
Если у кого то в Москве есть время уделить мне какое-то, могу приехать.
Ну очень надо. Брал под новогодние праздники в самый сезон. Осталось 20 дней, а пользоваться не могу.
Так пошел процесс или нет?
Я размер кореловской страницы делал в размер прямоугольника описывающего метки. Как пример: печать на формате 488*330, а размер кореловского файла 436,5*310. Так гораздо меньше проблем со смещением.

Да ни как. Плюнул я на эти метки. Просто вырезал, измерил смещение. Сделал второй файл для печати, в нем это смещение сделал и все. Из одного печатаю, из второго режу. Почти попадает. Ну бывает немного не сходится, но для моих задач не критично. Да и потом тот размер который мне нужно вырезать из SRA3 с метками не помещается. Так, что пока делаю по колхозному. Время нет сейчас на изучение. После НГ буду разбираться.
Вот теперь разбираюсь как биговку сделать. Делаю пунктирными прорезами. Одни мало, не бигуется. Другие так, что по этим линиям и рвется. Что то в настройках есть еще.
Так метки можно поменьше сделать. У меня были 5*5 мм, толщина 0,5 мм. Размер метки плоттеру пофигу. А толщина линии и расстояние от края листа очень критичны.
Смещение и размер страницы задается где-то в дебрях CM, и смутно помню, что что-то надо продублировать в плоттере с панели. Ищите самый нелогичный вариант, это и будет искомое.
Вот два выше предложенных способа я попробовал смещение осталось. Мне кажется смещение именно из за положения ножа. Оно именно 5 мм и смещение то же по этому в процентах или в чем то регулировать его нет смысла. Просто как я понимаю режет пленку и у них такой проблемы нет вообще. вставил, нажал и получил, что надо.
А мне вот меловку. Но я уже разобрался со многим кроме смещения.
Меловку режет отлично (то, что нужно мне). Биговку сделал пунктиром 4 в один проход, а резку сделал линией в два прохода. Все получилось очень даже хорошо. И метки в данном случае практически не нужны.
Размер бумаги всегда один и тот же. Принтер печатает одинаково.
Делаю смещение вручную и все.
Разберусь с метками потом, расскажу тут в чем загводка.
Кстати научился вставлять листы. Он их же измеряет. 10 подряд с точностью до миллиметра. Так, что в принципе задачу свою я решил.
С SRA3 режет 27,8 на 40,5. Шире поставить не позволяет расстояние между роликами, а длина почему 40,5. ну наверное так надо.
GRAPHTEC PRO STUDIO
The Graphtec Pro Studio is an enhanced edition of Graphtec Pro Studio. It has additional functions for improving productivity and creating advanced design. It is required to activate and upgrade the software by the purchased activation code after the Graphtec Pro Studio is installed. Please refer the document for installing the software.
It is the software for creating original designs and has enhanced functions such as auto-shapes, shading, and editing functions. It is like the popular graphics design software as the Adobe Illustrator and CorelDRAW. It can also configure the cutting conditions and other settings on the plotter. Importing of EPS, Ai, CMX, and PDF file types are supported. Graphics created with other popular design software can be imported into this software.
Imports Adobe Illustrator/CorelDRAW file
It supports the importing of files in the ai format, cmx format, and others into Graphtec Pro Studio. Graphics created with popular design software such as Adobe Illustrator or CorelDRAW can be imported without converting the file format. The cutting job can be performed using only Graphtec Pro Studio even if the design is created using Adobe Illustrator or CorelDRAW by a designer.
STREAMLINE YOUR BUSINESS
This powerful software contains all of the necessary tools for creating professional designs, configuring the plotter, and outputting jobs all within one program.
30+ FILE FORMAT COMPATIBILITY
Popular file types including AI, CMX, EPS, JPG, and DXF can be imported, modified, and cut.
MAIN FEATURES
CREATING THE REGISTRATION MARKS
The registration marks can be added into the arts board of the design application software. It can be selected from 10 patterns according to the design object size and the precision of axis alignment in the Print & Cut applications.
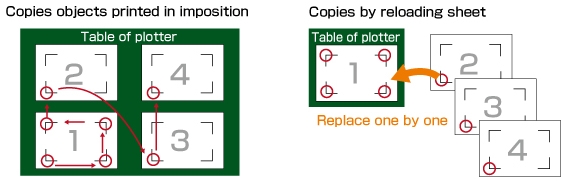
TILING (SPLIT THE OBJECT)
The cutting object can be split into smaller tiles. When the object needs to be placed to the surface made by multiple panels or is larger than the width of the media, the object can be split to size for fit it.
MATRIX COPY
It is used for creating multiple copies of the same object. The object is copied in specified matrix condition.

WEED LINES AND BORDER
The border line and weeding lines can be added around the cutting object automatically and then it is cut. It makes easier to remove the excess material from the media.

TOOL ASSIGNMENT
Graphtec Pro Studio is able to assign the tool condition to the each color or the layer. The settings of tool condition as force, speed, quality (acceleration) and others can be set for the each color or the layer. It can be performed in a single job by process of different types.
SUPPORTS NEWEST ARMS 6.0 ON FCX2000
It supports ARMS (Advanced Registration Mark Sensing system) 6.0. New functions such as supporting crop mark, supporting processing on the reverse side, reversed color mark are available. It enables to enhance usability
OFFLINE OPERATION USING THE USB FLASH MEMORY
Plot data is created from the design by using Cutting Master 4, then it is saved to USB memory. The plot data file can be selected from the USB on the plotter, then cutting is performed. This simplified work-flow enables users to operate without a computer.
[Compatible models] FCX2000

DATA MANAGEMENT USING BAR-CODE WITH USB FLASH MEMORY
In Print & cut operation, the plot data is automatically selected from USB flash memory by scanning the bar-code printed on the media. Bar-code is created by using Graphtec Pro Studio. This prevents the usage of incorrect data, and improves work efficiency.
[Compatible models] FCX2000

COPY DATA WITH REGISTRATION MARKS
After data is sent the first time, it can be copied multiple times without a PC. In the FCX2000, the first four marks are scanned on the first sheet, and only the first mark in subsequent sheets. Graphtec Pro Studio is able to configure FCX 2000 to execute copy in this condition. This improves productivity by shorting scan detection time.
[Compatible models] CE6000 PLUS / FCX2000 / FC8600 / FC4500
CREATING REGISTRATION MARKS IN REVERSED COLOR
The Cutting Master 4 is able to create the registration marks either one of the normal style or reversal style. he reversal style mark has the reversed color and it is able to detect the mark on the media such as the type of glossy or shiny. It enables to expand the compatible media for the Print & Cut applications.
[Compatible models] CE6000 PLUS / FCX2000 / FC8600

REVERSE SUDE CUTTING/CREASING USING REGISTRATION MARKS
Cutting and creasing can be aligned to the printed graphics even if processing is performed on the reverse side of the media. This prevents any scratches or damage to the printed graphic. Graphtec Pro Studio is able to configure FCX2000 to execute the process in this condition. [Compatible models] FCX2000

EXPANDED CUTTING AREA
It expands the cutting area to include objects outside of the area enclosed by registration marks. Production efficiency is enhanced by reducing media waste.
[Compatible models] CE6000 PLUS / FCX2000 / FC8600

LINES PATTERN
It can set configuration of line intuitively to plot such as style, width, corner, color, join, end cap, and position.
[Compatible models] CE6000 PLUS / FCX2000 / FC8600

OUTLINE
It creates new lines (paths) in specified space from the object.

FILL
It can easily paint colors on a object in the illustration and can also fill in a gradient or pattern.

AUTO TRACING
The imported bitmap (raster) images is able to be converted into vector objects. There is a powerful noise reduction function.

COMBINE OBJECTS
It can edit the overlapped objects using the effects function into a single object or multiple objects.

Main Functions
| Category | Function | Graphtec Pro Studio | Graphtec Pro Studio Plus | Description |
|---|---|---|---|---|
| File | Acquire Image | X | X | Capturing the image from the scanner. |
| Archive to Cloud | X | X | Saving the job to the SAiCloud. | |
| Send to Approval Tool | X | X | Saving the job to the approval tool on the SAiCloud. | |
| Work-space | X | X | Switching the location of the menus and buttons like the style of the software that is familiar with you. | |
| View | Color | X | X | Editing the color. |
| Show | X | X | Displaying the ruler, grid and guide lines. | |
| Snap | X | X | Moving the object relative to the guide or grid. | |
| Arrange | Group | X | X | Grouping objects. |
| Lock | X | X | Locking the object for setting to non editable. | |
| Contour Cut | X | X | Creating a contour cutting line of objects. | |
| Convert to Outlines | X | X | Converting the object to path. | |
| Path Direction | X | X | Specifying the direction of cutting when the object data is output. | |
| Order | X | X | Arrange the selected object as bring to the front or send to the back. | |
| Align | X | X | Aligning the object to reference that is specified in sub-menu. | |
| Distribute | X | X | Distributing all objects evenly in the effective area by the specified method. | |
| Nest | — | X | Performing the simple nesting by moving the object along the X- or Y-axis. | |
| True Shape Nest | — | X | Performing the advanced nesting by moving the object including the rotation. | |
| Deskew | — | X | Correcting a skew of the imported image from the scanner. | |
| Step and Repeat | X | X | Performing complex replication as the matrix copy. | |
| Auto Serialize | — | X | Creating a copy of the object that has the serialized number in each copy. | |
| Cut Order | — | X | Starting the cutting simulator that shows the cutting order in the animation. | |
| Text | Font | X | X | Setting the font type of the character. |
| Justification | X | X | Aligning the string of text. | |
| Find/Replace | X | X | Search or replacing the text. | |
| Check Spelling | — | X | Checking the spelling. | |
| Case | X | X | Switching between uppercase and lowercase in letters. | |
| Insert Symbols | — | X | Creating the Braille, bar code, QR code, and data matrix. | |
| Effects | Combine | X | X | Combining objects. |
| Lens | — | X | Changing the appearance by applying a lens effect to overlapped objects. | |
| Contour Cut | X | X | Creating the cutting line of objects. | |
| Contour Cut Mark | X | X | Creating the registration marks to the object that has the cutting line. | |
| Page Contour Cut Mark | X | X | Cutting the object that is located the outside area enclosed by the registration marks. | |
| Distortion | — | X | Deforming the object. | |
| Shadow | X(*) | X | Adding shadows to objects. (* Only drop shadow.) | |
| Color Trapping | — | X | Removing the overlapping portions of objects without a gap | |
| Brend | — | X | Creating new objects that is changing the shape and color in stepwise between the specified two objects. | |
| Rhinestone Fill | — | X | Creating holes for the rhinestone that fills the object or fits the contour of the object. | |
| Bitmap | Bitmap Edit Toolbar | X | X | Editing a bitmap object. |
| Vectorize (Auto-trace) | X | X | Automatically converting the bitmap object to the path. | |
| Vectorize (Others) | — | X | Converting the bitmap object to the path. | |
| Rasterize | — | X | Converting a vector object into a bitmap. | |
| Filters | X | X | Applying filter effect to the bitmap object. | |
| Tools | Vector Eraser | X | X | Clearing any objects in the area that specify by dragging of the eraser tool. |
| Cleaver by Path | — | X | Splitting the created object, each split object can be edited. | |
| Cut/Plot | Preview window | X | X | Moving the tool carriage that response to the position change of the cutting job. |
| Preview | X | X | Showing the actually cutting job size by moving the tool carriage. | |
| Copies | X | X | Specifying the number of copies of the job. | |
| Repeat job | X | X | Specifying to send the job to the cutter repeatedly. | |
| Centering | X | X | Specifying location of the job on the page. | |
| Rotate | X | X | Rotating the job in 90 degree. | |
| Mirror | X | X | Creating the mirror image of the job. | |
| Total tiles | X | X | Displaying the total number of tiles. (Indication only) | |
| Weed lines | X | X | Adding lines for weeding. | |
| Weed border | X | X | Adding the border line in the specified margin for weeding. | |
| Driver option | X (*) | X | Enabling to specify the cutting condition for each color / layer. (*Color only) | |
| Change order of color or layer | X (*) | X | Specifying the cutting order for each color / layer. (* color only) | |
| Pause between colors or layers | X (*) | X | Pausing after the end of cutting of each color / layer. (* Color only) | |
| Import or export the cutting condition settings | X | X | Saving or loading the cutting conditions. | |
| Over cut | X | X | Cutting the contour line longer by the specified length in order to completely cut objects. | |
| Eliminate line-segment overlap | X | X | Deleting the overlapped paths or others. | |
| Position offset | X | X | Moving the cutting job in specified distance. | |
| Offset in registration mark | X | X | Adjusting the cutting position within the area enclosing the registration marks. | |
| Divide (cut segment) | X | X | Performing the process for each segmented area when there are additional registration marks on the cutting job. | |
| Revers-side Registration Mark | X | X | Making process at the reverse-side using the registration marks printed on the front surface. | |
| Save to file | X | X | Creating the plot file for offline operation. | |
| Use Bar-code | X | X | Creating the bar-code for managing the cutting data. | |
| Reversed color mark | X | X | Creating the registration marks in reversal color that is the white mark on black background. | |
| Color selection of mark | X | X | Specify the color of mark line and the color of paint around mark. |
Supported File Formate
| File format | Extension | File format | Extension |
|---|---|---|---|
| Scalable Vector Graphics (*1) | SVG | ROBO Master (*2) | GSD / GST / GSP |
| D-CUT Master (* Graphtec Pro Studio only.) | CUT | EnRoute | ENR |
| Portable Document Format | Flexi SIGN 5.x | fs / pd / fd / fc / fe | |
| Adobe Illustrator | AI | Flexi SIGN 6.x, 7, 7.5 | FS |
| Encapsulated Postscript | EPS | Gerber Clip Art | GCA |
| Auto CAD Interchange Format | DXF | HPGL | hpg / hgl / plt |
| CorelDRAW Exchange Meta-file | CMX | HPHL / 2 | hpg / hgl / plt |
| Windows Meta-file | WMF | Ikuras | IK |
| Portable Network Graphics | PNG | Inspire | SCI |
| Joint Photographic Experts Group | JPEG | JPEG | JPG |
| Bitmap | BMP | Kodak Flash-pix | FPX |
| Tagged Image File Format | TIFF | Kodak Photo-CD | PCD |
| Personal Computer Exchange | PCX | Macintosh Quick-draw PICT | PCT |
| AutoCAD Drawing | DWG | Targa | TGA |
| CASmate | SCV | Text File | TXT |
| Clip Art | CA | Zsoft PC Paintbrush | PCX |
| Digital Microprocessor Plotter Language | PLT |
(*1) Restricted items in using SVG file
• When the SVG file containing registration marks is imported for print and cut application, it is required to specify or add contour cutting line.
• When editing contents in the imported SVG file, it is required to ungroup contents.
• Font size of text included in the SVG file are not reproduced. It is recommended that converting the font to outline before creating the SVG file.
• Following elements contained in the SVG file may not be reproduced correctly.
Gradation, Transparent, Pattern, Image, Layer
• The SVG files created under the following conditions can not be used.
— When registration marks are contained in the SVG file, the SVG file is created by an application that is different from the application created the register marks.
— The SVG file is created by the Export function. It is required to create the SVG file using Save As on File menu.
(*2) Restricted items in using file created by ROBO Master (file type: GSD, GST, GSP)
• When the ROBO Master file containing registration marks is imported for print and cut application, it is required to specify or add contour cutting line.
• When editing contents in the imported ROBO Master file, it is required to ungroup contents.
• When opening a ROBO Master file containing text, a screen for selecting fonts is displayed, it is required to specify the font to use. The imported text is handled in the same way as the text written in Graphtec Pro Studio, the outline may not match the display on the ROBO Master even if the same font is specified. It is recommended to convert the text to outline data in advance using the Join graphic menu on Edit menu of ROBO Master.
• Following elements contained in the ROBO Master file may not be reproduced correctly.
Gradation, Transparent, Pattern, Image, Layer, Font.