Отладка JavaScript с помощью консоли в Visual Studio
Окно консоли JavaScript можно использовать для взаимодействия и отладки приложений UWP, созданных с использованием JavaScript. Эти возможности поддерживаются для приложений UWP и приложений, созданных с помощью Средств для Apache Cordova в Visual Studio. Справочник по консольным командам см. в разделе JavaScript Console commands.
Окно консоли JavaScript предоставляет вам следующие возможности:
Отправка объектов, значений и сообщений из приложения в окно консоли.
Просмотр и изменение значений локальных и глобальных переменных в запущенном приложении.
Просмотр визуализаторов объектов.
Запуск кода JavaScript, который выполняется в текущем контексте скрипта.
Просмотр ошибок и исключений JavaScript в дополнение к исключениям модели DOM и среды выполнения Windows.
С помощью окна консоли JavaScript можно взаимодействовать с приложением, не останавливая и не перезапуская отладчик. Дополнительные сведения см. в статье об обновлении приложения JavaScript. Сведения о других возможностях отладки JavaScript, таких как использование Проводника DOM и задание точек останова, см. в статьях Краткое руководство. Отладка файлов HTML и CSS и Отладка приложений в Visual Studio.
Отладка с использованием окна консоли JavaScript
Далее приведена процедура создания приложения FlipView и инструкции по интерактивной отладке ошибки кодирования JavaScript.
Здесь в качестве примера используется приложение UWP. Однако описываемые здесь функции консоли также применимы к приложениям, созданным с помощью инструментов Visual Studio для Apache Cordova.
Отладка кода JavaScript в приложении FlipView
Создайте новое решение в Visual Studio, выбрав Файл > Новый проект.
Выберите элементы JavaScript > Универсальная платформа Windows, а затем элемент Приложение WinJS.
В элементе BODY файла index.HTML замените существующий код HTML следующим кодом:
Откройте файл default.css и добавьте следующий код CSS для селектора #fView :
Откройте файл default.js и замените код следующим кодом JavaScript:
Если цель отладки еще не выбрана, на панели инструментов Отладка в раскрывающемся списке рядом с кнопкой Устройство выберите Локальный компьютер.

Нажмите клавишу F5, чтобы запустить отладчик.
Приложение выполняется, но изображения отсутствуют. Ошибки APPHOST в окне консоли JavaScript указывают на отсутствие изображений.
Во время выполнения приложения FlipView в строке ввода окна консоли (рядом с символом «>>») введите Data.items и нажмите клавишу ВВОД.
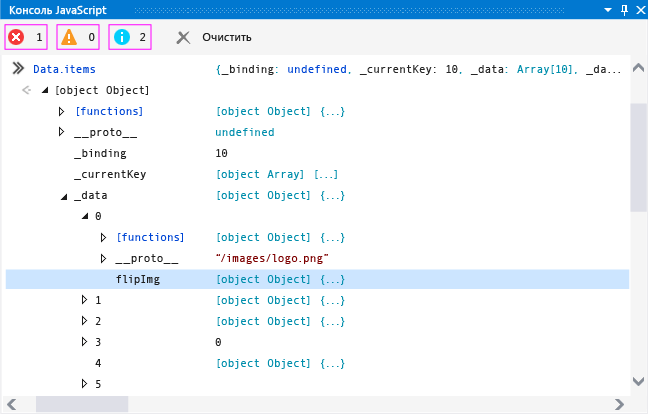
Также обратите внимание на то, что в объекте items._data существует намного больше элементов, чем ожидалось.
Чтобы устранить эту проблему в интерактивном режиме без остановки сеанса отладки, откройте файл default.js и выберите этот код функции updateImages :
Скопируйте и вставьте этот код в строку ввода консоли JavaScript.
При вставке нескольких строк кода в строку ввода консоли JavaScript строка ввода консоли автоматически переключается в многострочный режим. Можно нажать сочетание клавиш Ctrl + Alt + M для включения и отключения многострочного режима. Чтобы выполнить скрипт в многострочном режиме, нажмите клавиши Ctrl + Ввод или выберите символ стрелки в правом нижнем углу окна. Дополнительные сведения см. в разделе Однострочный и многострочный режим в окне консоли JavaScript.
Выберите символ зеленой стрелки, чтобы выполнить скрипт.
Нажмите клавиши CTRL+ALT+M, чтобы переключить строку ввода консоли в однострочный режим, а затем выберите Очистить входную строку (красный значок «X») чтобы удалить код из строки ввода.
Введите в командной строке Data.items.length = 3 и нажмите клавишу ВВОД. Это позволяет удалить лишние элементы данных.
В обозревателе DOM отображается обновленный элемент DIV, и можно перейти в поддерево, чтобы найти нужные элементы IMG.
Остановите отладку, выбрав Отладка > Остановить отладку или нажав клавиши SHIFT+F5, а затем исправьте исходный код.
Полную страницу default.html с исправленным примером кода см. в разделе Отладка примера кода HTML, CSS и JavaScript.
Интерактивная отладка и режим приостановки выполнения
Можно использовать точки останова и пошаговое выполнение кода при использовании таких средств отладки JavaScript, как окно консоли JavaScript. Если программа, которая выполняется в отладчике, оказывается в точке останова, отладчик временно приостанавливает выполнение программы. Если выполнение приостановлено, программа переключается из режима выполнения в режим приостановки выполнения. Выполнение можно возобновить в любой момент.
Настройка точки останова и отладка приложения
Выберите Отладка > Начать отладку или нажмите клавишу F5.
Приложение входит в режим приостановки выполнения, когда выполнение достигает функции updateImages() и текущая строка выполнения программы выделяется желтым.

Можно изменить значения переменных, чтобы немедленно изменить состояние программы, не завершая текущего сеанса отладки.
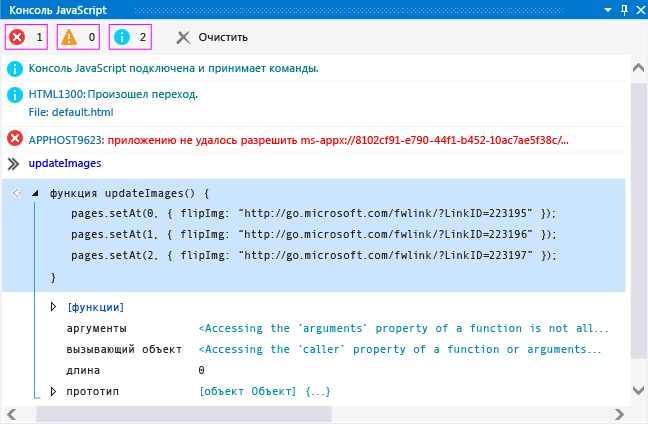
Введите в командной строке updateImages и нажмите клавишу ВВОД. В окне консоли отображается визуализатор для данной функции.
Выберите функцию в окне консоли, чтобы отобразить ее реализацию.
На следующем рисунке показано окно консоли на этом этапе.
Скопируйте одну строку функции из окна вывода в строку ввода и измените значение индекса на 3:
Нажмите клавишу ВВОД, чтобы выполнить эту строку кода.
Если требуется пошаговое выполнение кода по одной строке, нажмите клавишу F11 или нажмите клавишу F5, чтобы продолжить выполнение программы.
Чтобы вернуться в Visual Studio, нажмите клавишу F12 или сочетание клавиш Alt + Tab.
Однострочный и многострочный режим в окне консоли JavaScript
Строка ввода в окне консоли JavaScript поддерживает однострочный и многострочный режим. Процедура интерактивной отладки в этом разделе включает примеры использования обоих режимов. Можно нажать сочетание клавиш Ctrl + Alt + M для переключения между режимами.
Однострочный режим позволяет просматривать историю ввода. Для перемещения по истории ввода можно использовать клавиши со стрелкой вверх и стрелкой вниз. В однострочном режиме строка ввода очищается при выполнении скриптов. Чтобы выполнить скрипт в однострочном режиме, нажмите клавишу ВВОД.
В многострочном режиме строка ввода при выполнении скриптов не очищается. При переключении из многострочного режима в однострочный можно очистить строку ввода, нажав клавишу Очистить входную строку (красный значок «X»). Чтобы выполнить скрипт в многострочном режиме, нажмите клавиши Ctrl + Ввод или выберите символ стрелки в правом нижнем углу окна.
Переключение контекста выполнения скрипта
На следующем рисунке показан список «Цель» в окне консоли JavaScript.

Отладка проектов JavaScript с помощью VS Code & Chrome Debugger
Отладка JavaScript не самый интересный аспект программирования на JavaScript, но это жизненно важный навык. В этой статье рассматриваются два инструмента, которые помогут вам отладить JavaScript как профессионал.
Представьте на мгновение, что функция console.log() не существует в JavaScript. Я уверен, что первый вопрос, который вы себе зададите, будет: «Как я смогу убедиться, что мой код работает правильно?»
Ответ заключается в использовании инструментов отладки. В течение долгого времени большинство разработчиков, включая меня, использовали console.log для отладки неработающего кода. Это быстрый и простой в использовании. Тем не менее, иногда вещи могут становиться привередливыми, если вы не знаете, где и что является причиной ошибки. Часто вы обнаруживаете, что расставляете ловушки console.log всему коду, чтобы увидеть, какой из них выявит виновника.
Предпосылки
Теперь мы готовы научиться отлаживать проект JavaScript в VS Code.
Отладка JavaScript в VS Code
Код довольно прост, и если у вас достаточно опыта в кодировании, вы можете заметить, что в нем есть пара ошибок. Если вы заметили их, пожалуйста, игнорируйте их. Если нет, отлично. Давайте добавим несколько строк внизу, чтобы вручную проверить код:

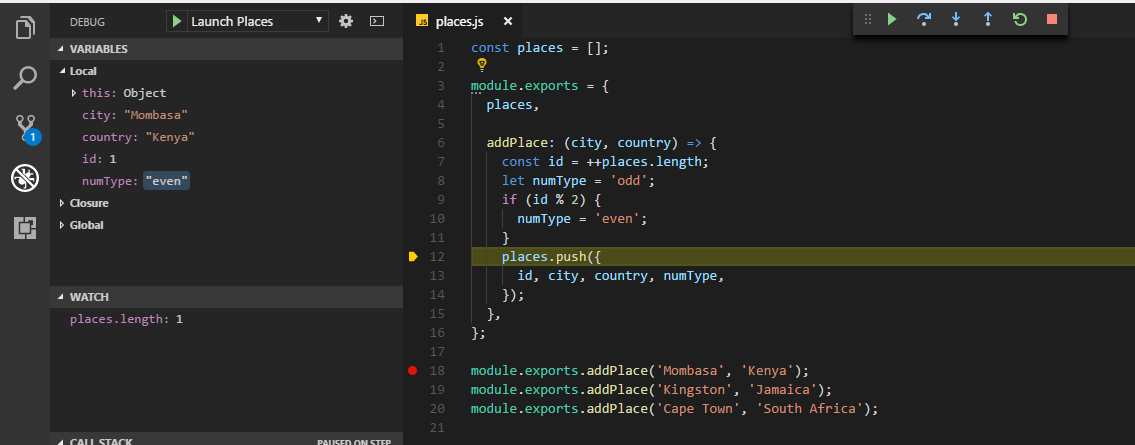
Видите красные точки на стороне? Это точки останова. Точка останова — это просто визуальная индикация, указывающая инструменту отладчика, где приостановить выполнение. Затем на панели действий нажмите кнопку отладки (значок с надписью «Ошибки не разрешены»).
Примечание. В зависимости от операционной системы вам может потребоваться заменить двойную обратную косую черту ( \\ ) на одну прямую косую черту ( / ).
Используйте любой метод, который вам нравится, и наблюдайте за процессом отладки в действии:

Ряд вещей происходит в быстрой последовательности, когда вы нажимаете кнопку отладки. Во-первых, есть панель инструментов, которая появляется в верхней части редактора. Имеет следующие элементы управления:
Вы также можете проверить все переменные, находящиеся в области действия, в разделе « Переменные ».
А пока просто завершите сеанс отладки. Мы исправим их в следующем разделе.
Отладка тестов с Mocha
Вы также можете запустить npm test для выполнения тестов. Вы должны получить следующий вывод:
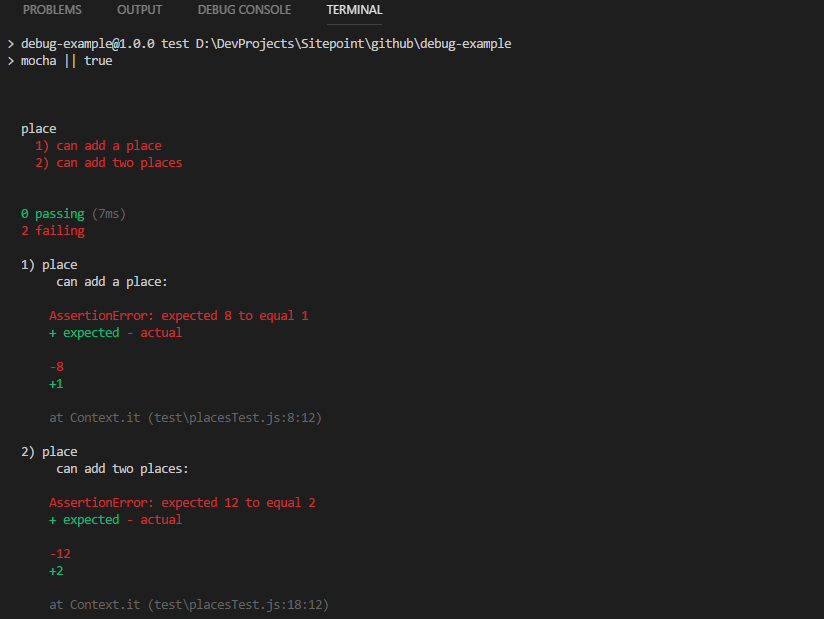
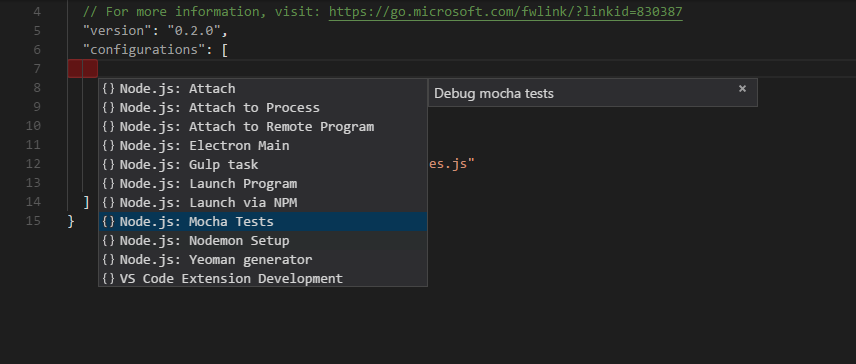
Все тесты не пройдены. Чтобы выяснить проблему, мы собираемся запустить тесты в режиме отладки. Для этого нам нужна новая конфигурация. Перейдите на панель отладки и щелкните раскрывающийся список, чтобы получить доступ к параметру « Add Configuration :

launch.json файл launch.json с всплывающим списком нескольких конфигураций на выбор.
Debugging
One of the key features of Visual Studio Code is its great debugging support. VS Code’s built-in debugger helps accelerate your edit, compile and debug loop.
Debugger extensions
VS Code has built-in debugging support for the Node.js runtime and can debug JavaScript, TypeScript, or any other language that gets transpiled to JavaScript.
For debugging other languages and runtimes (including PHP, Ruby, Go, C#, Python, C++, PowerShell and many others), look for Debuggers extensions in the VS Code Marketplace or select Install Additional Debuggers in the top-level Run menu.
Below are several popular extensions which include debugging support:
Tip: The extensions shown above are dynamically queried. Select an extension tile above to read the description and reviews to decide which extension is best for you.
Start debugging
The following documentation is based on the built-in Node.js debugger, but most of the concepts and features are applicable to other debuggers as well.
It is helpful to first create a sample Node.js application before reading about debugging. You can follow the Node.js walkthrough to install Node.js and create a simple «Hello World» JavaScript application ( app.js ). Once you have a simple application set up, this page will take you through VS Code debugging features.
Run view
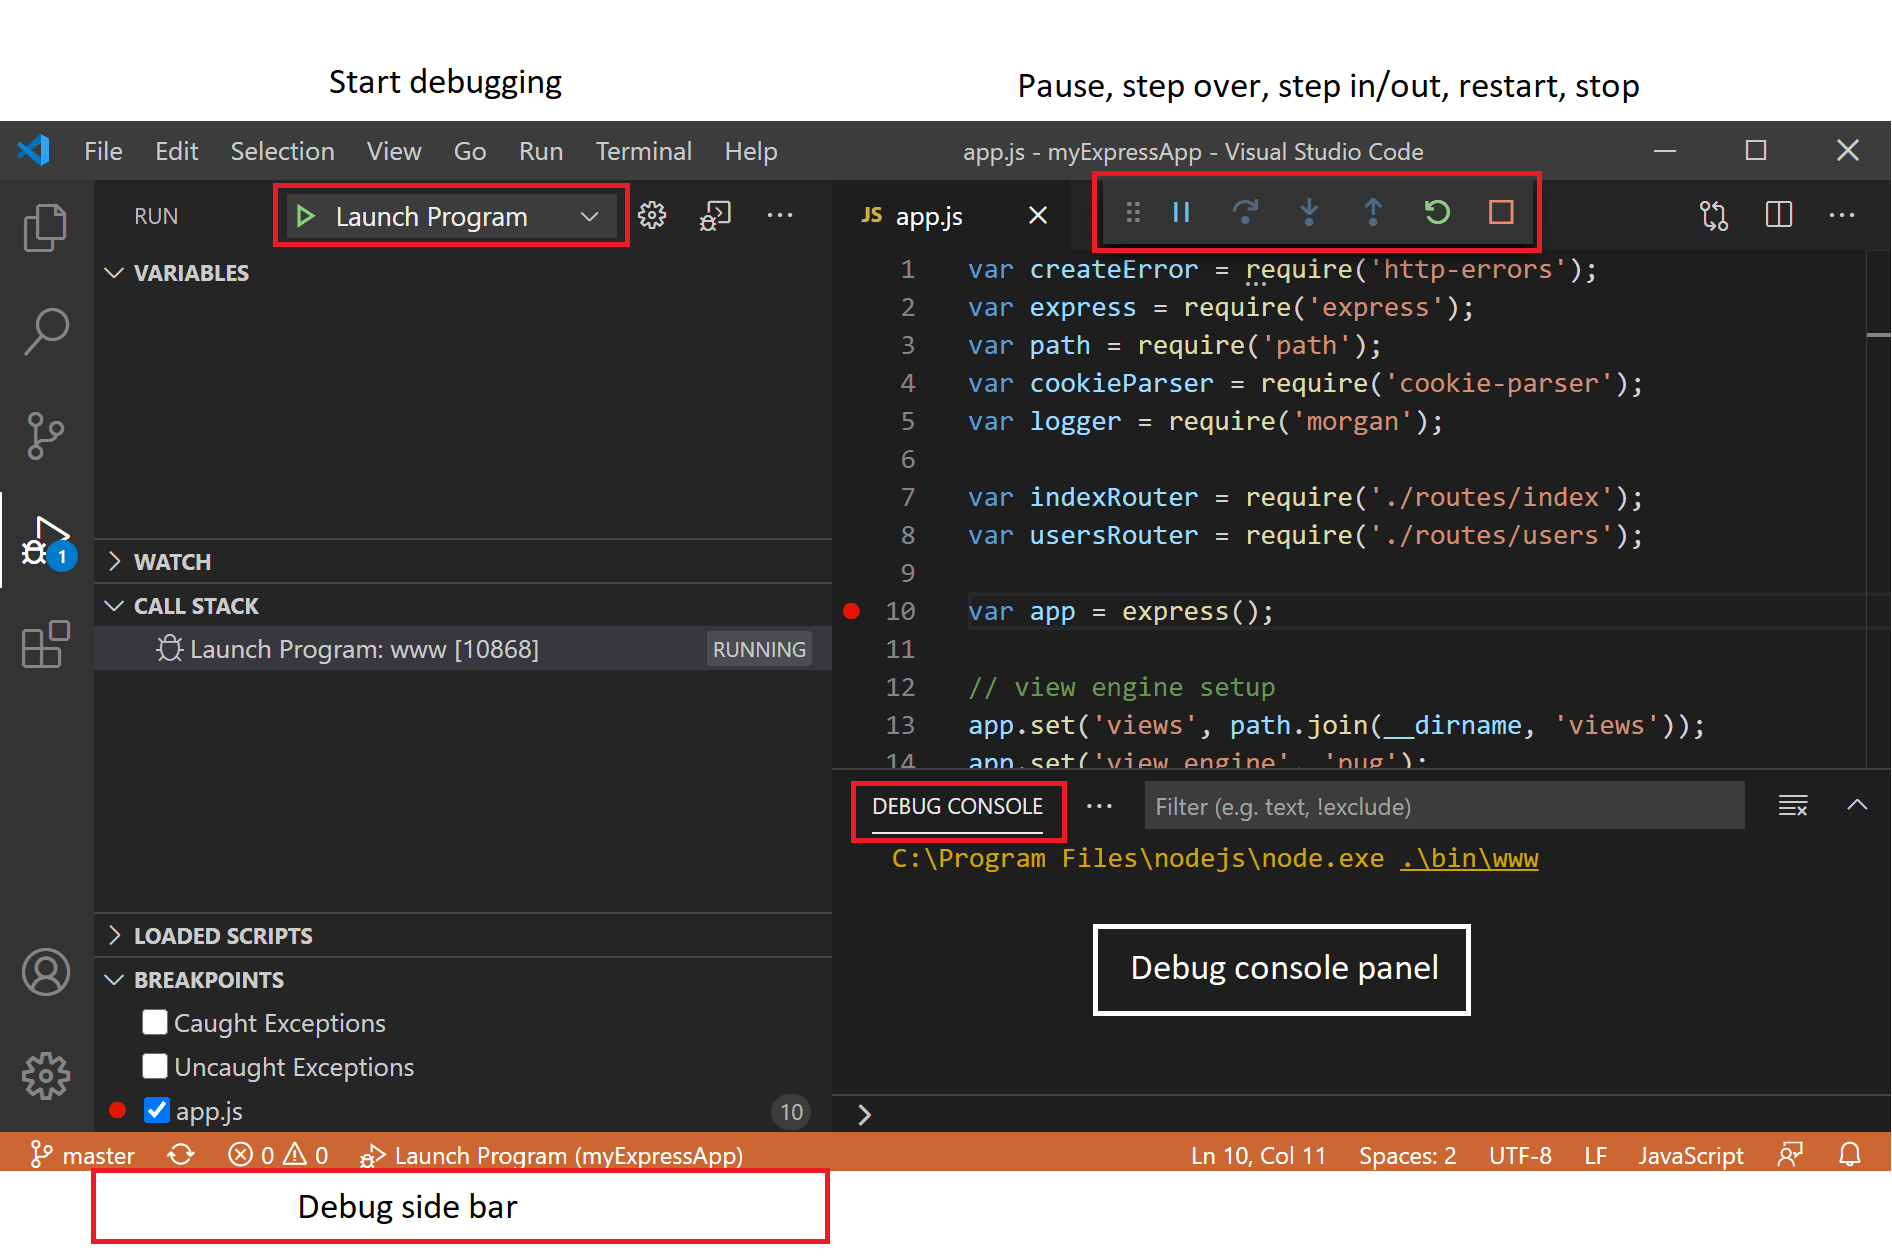
The Run view displays all information related to running and debugging and has a top bar with debugging commands and configuration settings.
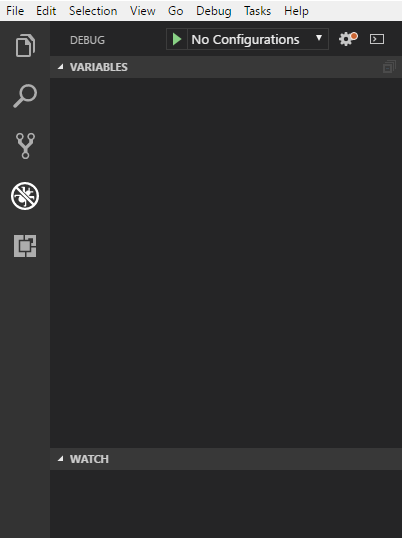
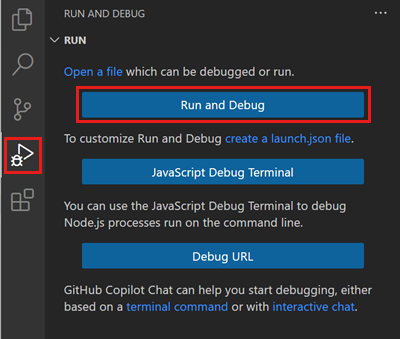
If running and debugging is not yet configured (no launch.json has been created), VS Code shows the Run start view.
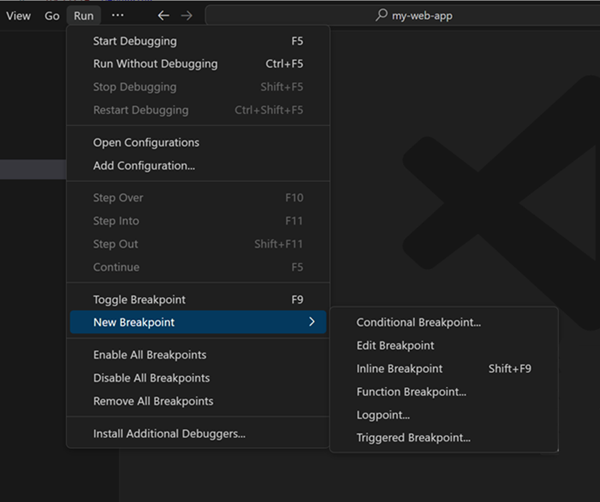
Run menu
The top-level Run menu has the most common run and debug commands:
Launch configurations
To run or debug a simple app in VS Code, select Run and Debug on the Debug start view or press F5 and VS Code will try to run your currently active file.
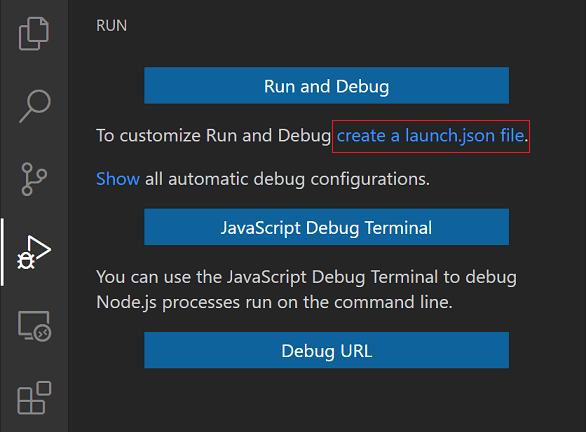
To create a launch.json file, click the create a launch.json file link in the Run start view.
VS Code will try to automatically detect your debug environment, but if this fails, you will have to choose it manually:
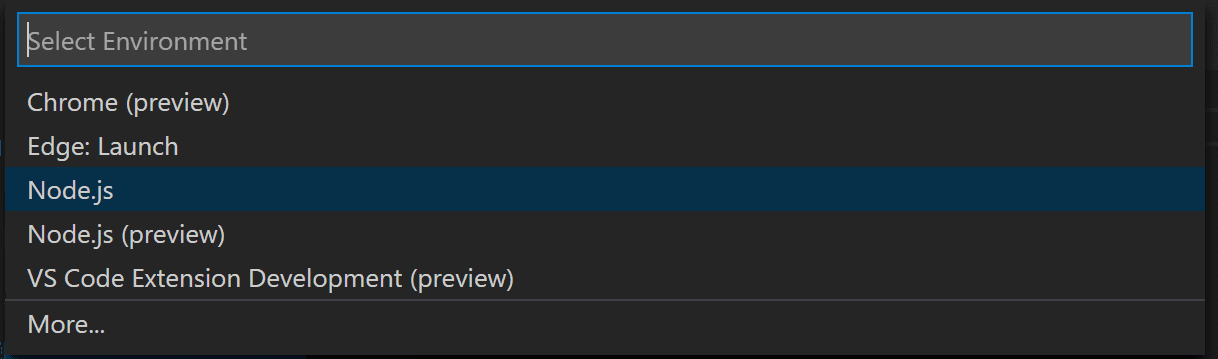
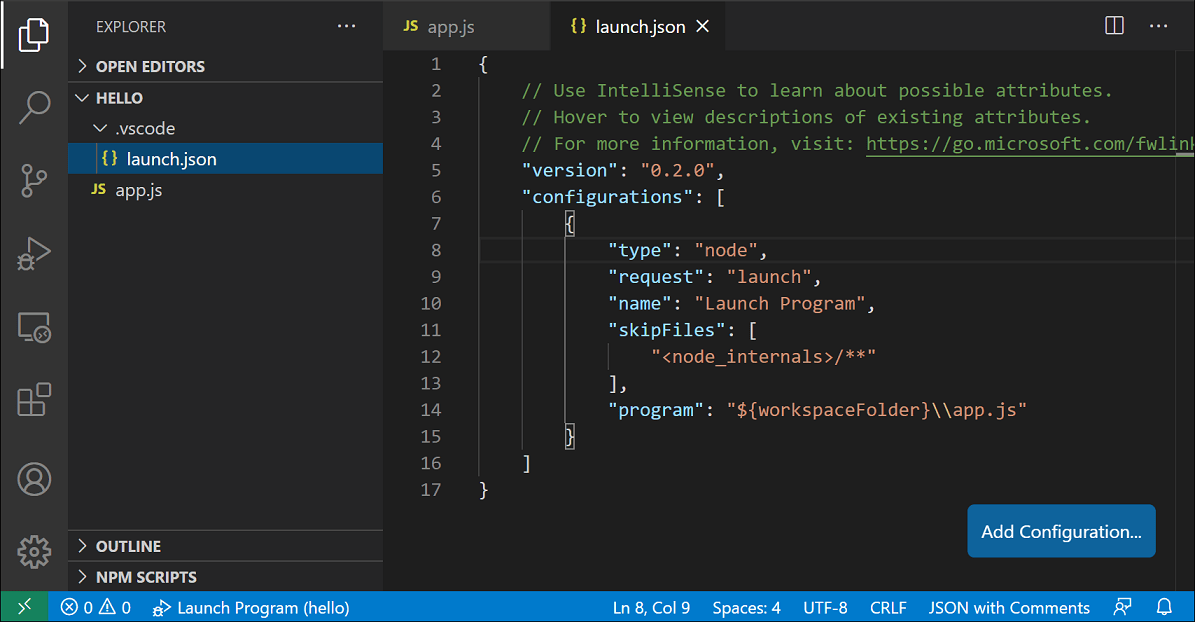
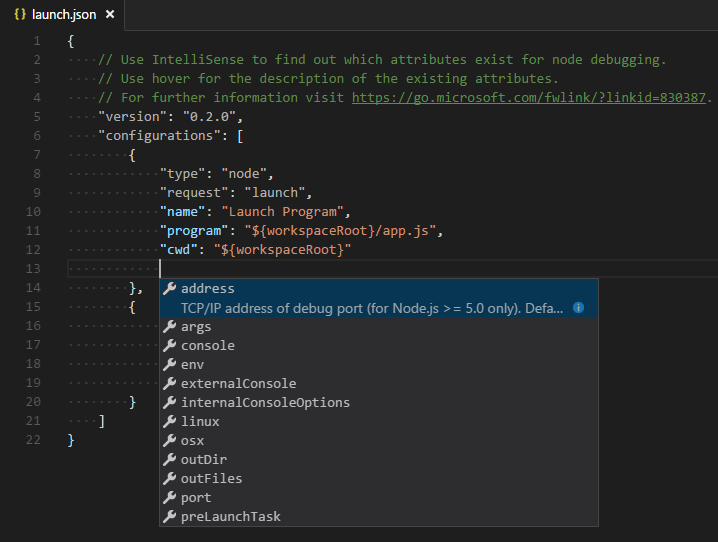
Here is the launch configuration generated for Node.js debugging:
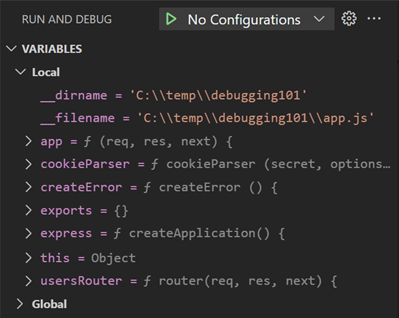
Note: You can debug a simple application even if you don’t have a folder open in VS Code, but it is not possible to manage launch configurations and set up advanced debugging. The VS Code Status Bar is purple if you do not have a folder open.
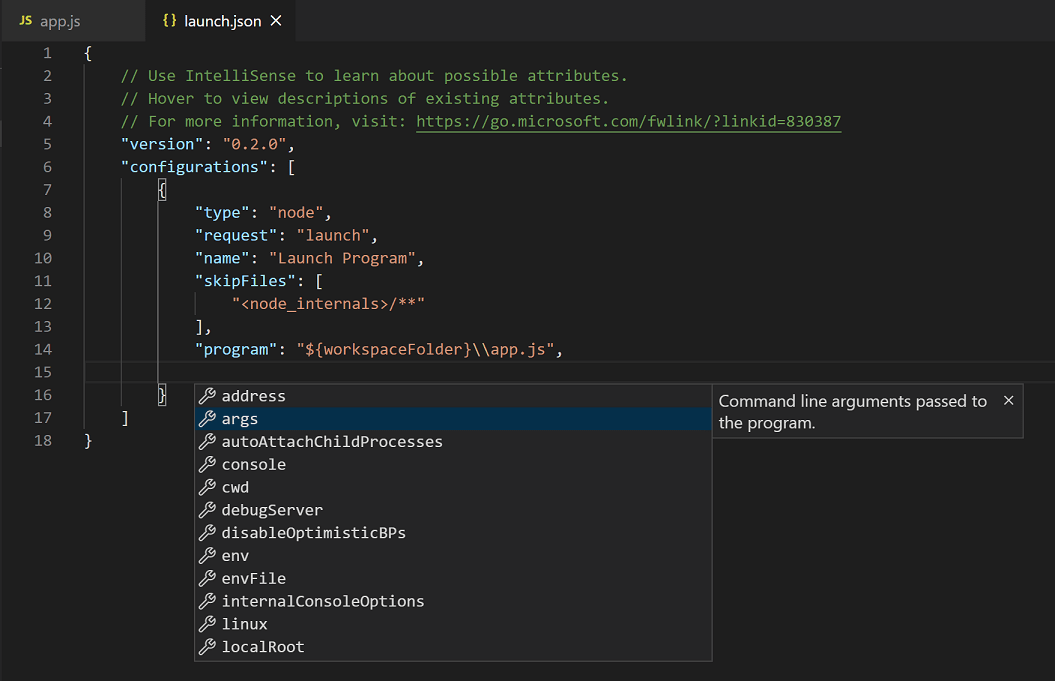
Note that the attributes available in launch configurations vary from debugger to debugger. You can use IntelliSense suggestions ( ⌃Space (Windows, Linux Ctrl+Space ) ) to find out which attributes exist for a specific debugger. Hover help is also available for all attributes.
Do not assume that an attribute that is available for one debugger automatically works for other debuggers too. If you see green squiggles in your launch configuration, hover over them to learn what the problem is and try to fix them before launching a debug session.
Review all automatically generated values and make sure that they make sense for your project and debugging environment.
Launch versus attach configurations
In VS Code, there are two core debugging modes, Launch and Attach, which handle two different workflows and segments of developers. Depending on your workflow, it can be confusing to know what type of configuration is appropriate for your project.
If you come from a browser Developer Tools background, you might not be used to «launching from your tool,» since your browser instance is already open. When you open DevTools, you are simply attaching DevTools to your open browser tab. On the other hand, if you come from a server or desktop background, it’s quite normal to have your editor launch your process for you, and your editor automatically attaches its debugger to the newly launched process.
The best way to explain the difference between launch and attach is to think of a launch configuration as a recipe for how to start your app in debug mode before VS Code attaches to it, while an attach configuration is a recipe for how to connect VS Code’s debugger to an app or process that’s already running.
VS Code debuggers typically support launching a program in debug mode or attaching to an already running program in debug mode. Depending on the request ( attach or launch ), different attributes are required, and VS Code’s launch.json validation and suggestions should help with that.
Add a new configuration
VS Code also supports compound launch configurations for starting multiple configurations at the same time; for more details, please read this section.
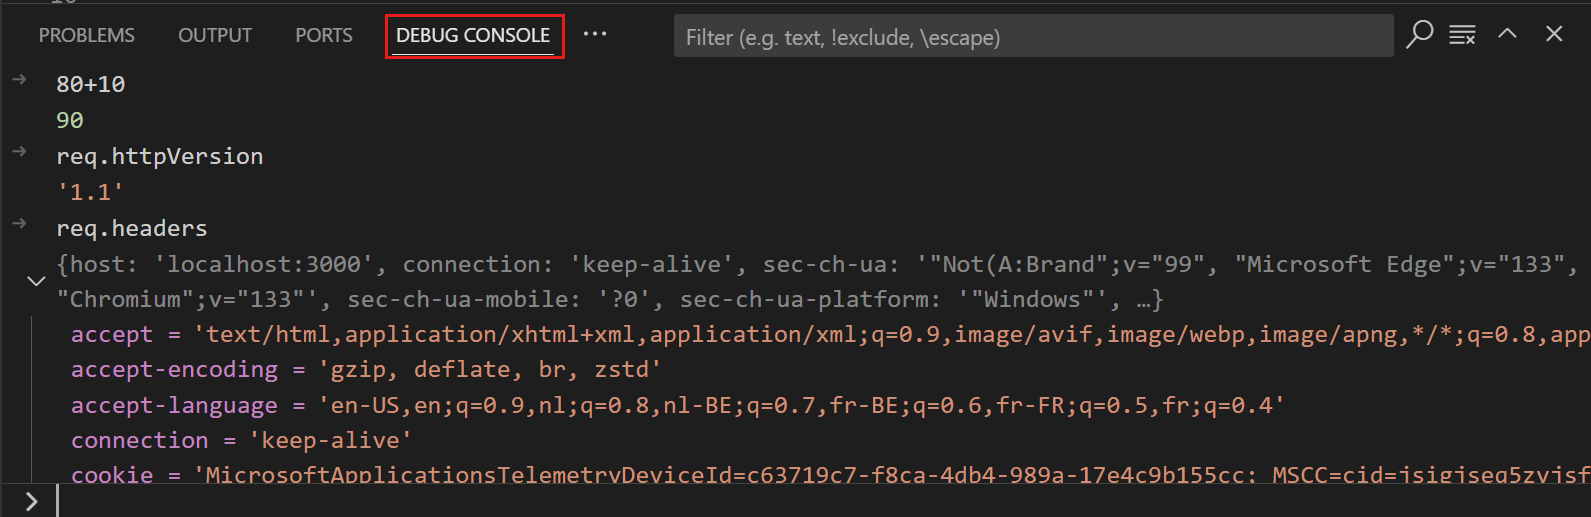
As soon as a debugging session starts, the DEBUG CONSOLE panel is displayed and shows debugging output, and the Status Bar changes color (orange for default color themes):
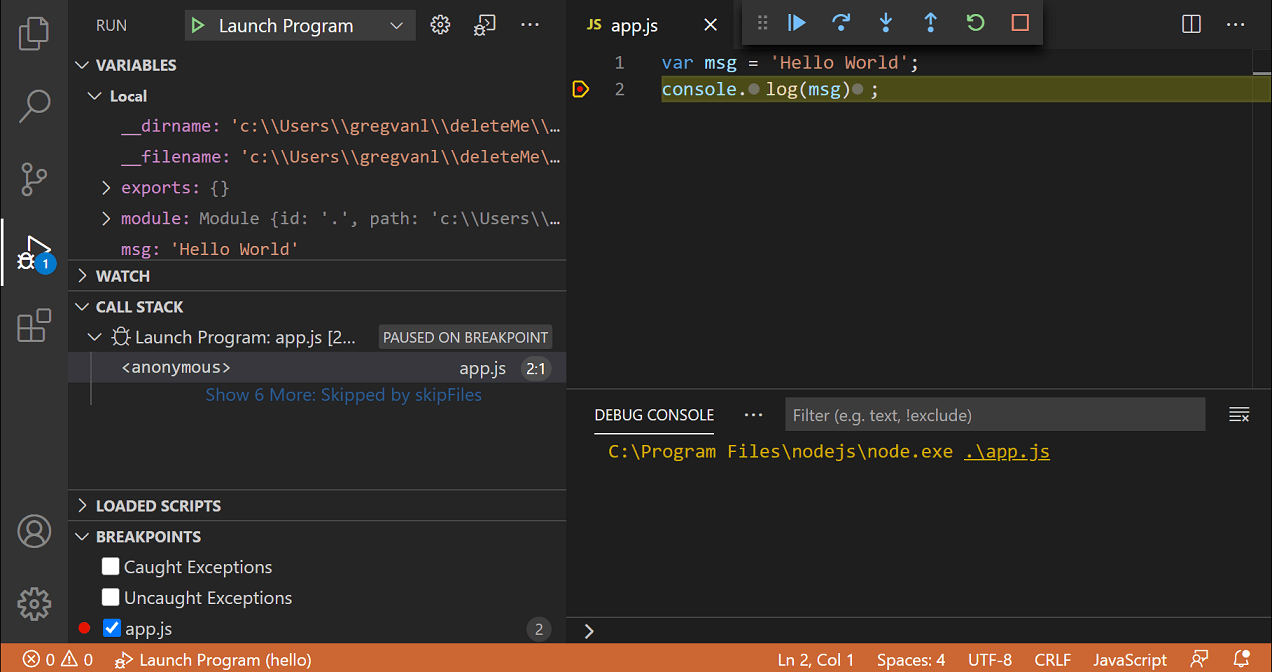
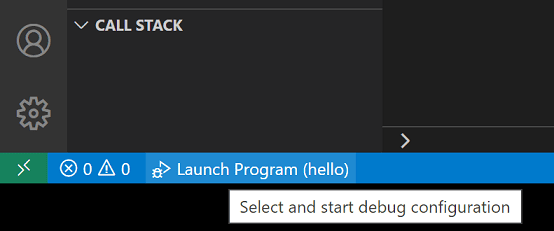
In addition, the debug status appears in the Status Bar showing the active debug configuration. By selecting the debug status, a user can change the active launch configuration and start debugging without needing to open the Run view.
Debug actions
Once a debug session starts, the Debug toolbar will appear on the top of the editor.

Run mode
In addition to debugging a program, VS Code supports running the program. The Debug: Run (Start Without Debugging) action is triggered with ⌃F5 (Windows, Linux Ctrl+F5 ) and uses the currently selected launch configuration. Many of the launch configuration attributes are supported in ‘Run’ mode. VS Code maintains a debug session while the program is running, and pressing the Stop button terminates the program.
Tip: The Run action is always available, but not all debugger extensions support ‘Run’. In this case, ‘Run’ will be the same as ‘Debug’.
Breakpoints
Breakpoints can be toggled by clicking on the editor margin or using F9 on the current line. Finer breakpoint control (enable/disable/reapply) can be done in the Run view’s BREAKPOINTS section.
The Reapply All Breakpoints command sets all breakpoints again to their original location. This is helpful if your debug environment is «lazy» and «misplaces» breakpoints in source code that has not yet been executed.

Optionally breakpoints can be shown in the editor’s overview ruler by enabling the setting debug.showBreakpointsInOverviewRuler :

Logpoints
A Logpoint is a variant of a breakpoint that does not «break» into the debugger but instead logs a message to the console. Logpoints are especially useful for injecting logging while debugging production servers that cannot be paused or stopped.
A Logpoint is represented by a «diamond» shaped icon. Log messages are plain text but can include expressions to be evaluated within curly braces (‘<>‘).
Just like regular breakpoints, Logpoints can be enabled or disabled and can also be controlled by a condition and/or hit count.
Note: Logpoints are supported by VS Code’s built-in Node.js debugger, but can be implemented by other debug extensions. The Python and Java extensions, for example, support Logpoints.
Data inspection
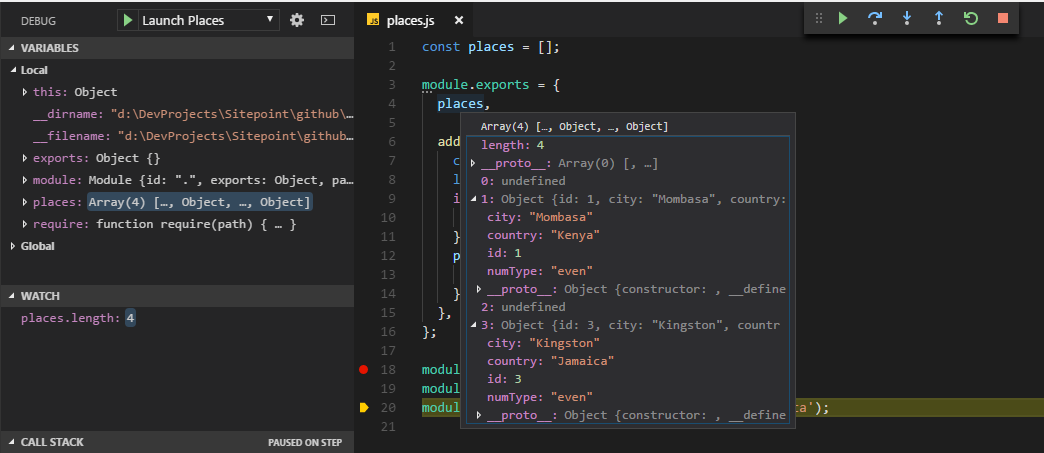
Variables can be inspected in the VARIABLES section of the Run view or by hovering over their source in the editor. Variable values and expression evaluation are relative to the selected stack frame in the CALL STACK section.
Variable values can be modified with the Set Value action from the variable’s context menu. Additionally, you can use the Copy Value action to copy the variable’s value, or Copy as Expression action to copy an expression to access the variable.
Variables and expressions can also be evaluated and watched in the Run view’s WATCH section.

Variable names and values can be filtered by typing while the focus is on the VARIABLES section

Launch.json attributes
There are many launch.json attributes to help support different debuggers and debugging scenarios. As mentioned above, you can use IntelliSense ( ⌃Space (Windows, Linux Ctrl+Space ) ) to see the list of available attributes once you have specified a value for the type attribute.
The following attributes are mandatory for every launch configuration:
Here are some optional attributes available to all launch configurations:
Many debuggers support some of the following attributes:
Variable substitution
Platform-specific properties
Launch.json supports defining values (for example, arguments to be passed to the program) that depend on the operating system where the debugger is running. To do so, put a platform-specific literal into the launch.json file and specify the corresponding properties inside that literal.
Below is an example that passes «args» to the program differently on Windows:
Valid operating properties are «windows» for Windows, «linux» for Linux and «osx» for macOS. Properties defined in an operating system specific scope override properties defined in the global scope.
Please note that the type property cannot be placed inside a platform-specific section, because type indirectly determines the platform in remote debugging scenarios, and that would result in a cyclic dependency.
In the example below debugging the program always stops on entry except on macOS:
Global launch configuration
VS Code supports adding a «launch» object inside your User settings. This «launch» configuration will then be shared across your workspaces. For example:
Advanced breakpoint topics
Conditional breakpoints
A powerful VS Code debugging feature is the ability to set conditions based on expressions, hit counts, or a combination of both.
You can add a condition and/or hit count when creating a source breakpoint (with the Add Conditional Breakpoint action) or when modifying an existing one (with the Edit Condition action). In both cases, an inline text box with a dropdown menu opens where you can enter expressions:
Condition and hit count editing support is also supported for function and exception breakpoints. You can initiate condition editing from the context menu, or the new inline Edit Condition action.
An example of condition editing in the BREAKPOINTS view: 
If a debugger does not support conditional breakpoints, the Add Conditional Breakpoint and Edit Condition actions will be missing.
Inline breakpoints
Inline breakpoints will only be hit when the execution reaches the column associated with the inline breakpoint. This is particularly useful when debugging minified code which contains multiple statements in a single line.
An inline breakpoint can be set using ⇧F9 (Windows, Linux Shift+F9 ) or through the context menu during a debug session. Inline breakpoints are shown inline in the editor.
Inline breakpoints can also have conditions. Editing multiple breakpoints on a line is possible through the context menu in the editor’s left margin.
Function breakpoints
Instead of placing breakpoints directly in source code, a debugger can support creating breakpoints by specifying a function name. This is useful in situations where source is not available but a function name is known.
A function breakpoint is created by pressing the + button in the BREAKPOINTS section header and entering the function name. Function breakpoints are shown with a red triangle in the BREAKPOINTS section.
Data breakpoints
If a debugger supports data breakpoints they can be set from the VARIABLES view and will get hit when the value of the underlying variable changes. Data breakpoints are shown with a red hexagon in the BREAKPOINTS section.
Debug Console REPL
Note: You must be in a running debug session to use the Debug Console REPL.
Redirect input/output to/from the debug target
Redirecting input/output is debugger/runtime specific, so VS Code does not have a built-in solution that works for all debuggers.
Here are two approaches you might want to consider:
Launch the program to debug («debug target») manually in a terminal or command prompt and redirect input/output as needed. Make sure to pass the appropriate command line options to the debug target so that a debugger can attach to it. Create and run an «attach» debug configuration that attaches to the debug target.
If the debugger extension you are using can run the debug target in VS Code’s Integrated Terminal (or an external terminal), you can try to pass the shell redirect syntax (for example » «) as arguments.
Here’s an example launch.json configuration:
This approach requires that the » preLaunchTask can be specified that is run before the individual debug sessions are started.
Compound launch configurations are displayed in the launch configuration dropdown menu.
Remote debugging
VS Code does not itself support remote debugging: this is a feature of the debug extension you are using, and you should consult the extension’s page in the Marketplace for support and details.
There is, however, one exception: the Node.js debugger included in VS Code supports remote debugging. See the Node.js Debugging topic to learn how to configure this.
Automatically open a URI when debugging a server program
Developing a web program typically requires opening a specific URL in a web browser in order to hit the server code in the debugger. VS Code has a built-in feature «serverReadyAction» to automate this task.
Here is an example of a simple Node.js Express application:
This application first installs a «Hello World» handler for the «/» URL and then starts to listen for HTTP connections on port 3000. The port is announced in the Debug Console and typically the developer would now type http://localhost:3000 into their browser application.
The serverReadyAction feature makes it possible to add a structured property serverReadyAction to any launch config and select an «action» to be performed:
Here the pattern property describes the regular expression for matching the program’s output string that announces the port. The pattern for the port number is put into parenthesis so that it is available as a regular expression capture group. In this example, we are extracting only the port number, but it is also possible to extract a full URI.
The uriFormat property describes how the port number is turned into a URI. The first %s is substituted by the first capture group of the matching pattern.
The resulting URI is then opened outside of VS Code («externally») with the standard application configured for the URI’s scheme.
Trigger Debugging via Edge or Chrome
To simplify things a bit, most properties are optional and we use the following fallback values:
Triggering an Arbitrary Launch Config
Here the serverReadyAction feature in action:

Next steps
To learn about VS Code’s Node.js debugging support, take a look at:
To see tutorials on the basics of Node.js debugging, check out these videos:
To learn about debugging support for other programming languages via VS Code extensions:
To learn about VS Code’s task running support, go to:
To write your own debugger extension, visit: