код ошибки 0x800f0907 windows 10
Почему возникает ошибка 0x800f0900 и как ее устранить
Ошибка 0x800f0900 может возникнуть во время установки кумулятивного обновления для Windows 10. Зачастую пользователи жалуются на эту ошибку, когда пытаются установить апдейт KB4464218, но это может происходить и с другими пакетами, например, KB4056887.
0x800f0900 — вполне типичная ошибка для Центра обновления (WU), которая решается набором давно проверенных способов. Средство устранения неполадок, SFC и DISM, полный сброс компонентов WU — вот что мы сейчас с вами рассмотрим ниже.
Решение ошибки 0x800f0900
Способ №1 Средство устранения неполадок
Запуск средства устранения неполадок — это самое первое, что вы должны попробовать в случае появление 0x800f0900 и других подобных ошибок. Делается это следующим образом:
Перезагрузите компьютер после использования средства устранения неполадок, после чего еще раз запустите обновление Windows 10.
Способ №2 Запуск SFC и DISM
Поврежденные системные файлы легко могут самые разные проблемы для системы, включая и различные ошибки при обновлении. Мы рекомендуем воспользоваться SFC и DISM, чтобы восстановить потенциальные повреждения. Сделайте следующее:
Проверьте, была ли исправлена ошибка 0x800f0900 при обновлении Windows 10.
Способ №3 Сброс компонентов Центра обновления (WU)
Сброс компонентов Центра обновления — способ, который зачастую решает все неполадки во время апдейта Windows 10. Обычно, пользователя выполняют его с помощью особого набора команд, которые вводятся, как несложно догадаться, в Командную строку. Тем не менее в сети можно найти кучу смышленых ребят, которые составили скрипты для автоматизированного выполнения подобного процесса.
Откройте самый обычный Блокнот (Win+R→notepad) и вставьте в него следующий скрипт:
call :print Checking the services status.
call :print Checking the services status.
:: —— Delete the qmgr*.dat files ——
call :print Deleting the qmgr*.dat files.
del /s /q /f «%ALLUSERSPROFILE%\Application Data\Microsoft\Network\Downloader\qmgr*.dat»
del /s /q /f «%ALLUSERSPROFILE%\Microsoft\Network\Downloader\qmgr*.dat»
:: —— Renaming the softare distribution folders backup copies ——
call :print Deleting the old software distribution backup copies.
if exist «%SYSTEMROOT%\winsxs\pending.xml.bak» (
del /s /q /f «%SYSTEMROOT%\winsxs\pending.xml.bak»
)
if exist «%SYSTEMROOT%\SoftwareDistribution.bak» (
rmdir /s /q «%SYSTEMROOT%\SoftwareDistribution.bak»
)
if exist «%SYSTEMROOT%\system32\Catroot2.bak» (
rmdir /s /q «%SYSTEMROOT%\system32\Catroot2.bak»
)
if exist «%SYSTEMROOT%\WindowsUpdate.log.bak» (
del /s /q /f «%SYSTEMROOT%\WindowsUpdate.log.bak»
)
call :print Renaming the software distribution folders.
:: —— Reset the BITS service and the Windows Update service to the default security descriptor ——
call :print Reset the BITS service and the Windows Update service to the default security descriptor.
sc.exe sdset wuauserv D:(A;;CCLCSWLOCRRC;;;AU)(A;;CCDCLCSWRPWPDTLOCRSDRCWDWO;;;BA)(A;;CCDCLCSWRPWPDTLCRSDRCWDWO;;;SO)(A;;CCLCSWRPWPDTLOCRRC;;;SY)S:(AU;FA;CCDCLCSWRPWPDTLOCRSDRCWDWO;;WD)
sc.exe sdset bits D:(A;;CCLCSWLOCRRC;;;AU)(A;;CCDCLCSWRPWPDTLOCRSDRCWDWO;;;BA)(A;;CCDCLCSWRPWPDTLCRSDRCWDWO;;;SO)(A;;CCLCSWRPWPDTLOCRRC;;;SY)S:(AU;FA;CCDCLCSWRPWPDTLOCRSDRCWDWO;;WD)
sc.exe sdset cryptsvc D:(A;;CCLCSWLOCRRC;;;AU)(A;;CCDCLCSWRPWPDTLOCRSDRCWDWO;;;BA)(A;;CCDCLCSWRPWPDTLCRSDRCWDWO;;;SO)(A;;CCLCSWRPWPDTLOCRRC;;;SY)S:(AU;FA;CCDCLCSWRPWPDTLOCRSDRCWDWO;;WD)
sc.exe sdset trustedinstaller D:(A;;CCLCSWLOCRRC;;;AU)(A;;CCDCLCSWRPWPDTLOCRSDRCWDWO;;;BA)(A;;CCDCLCSWRPWPDTLCRSDRCWDWO;;;SO)(A;;CCLCSWRPWPDTLOCRRC;;;SY)S:(AU;FA;CCDCLCSWRPWPDTLOCRSDRCWDWO;;WD)
:: —— Reregister the BITS files and the Windows Update files ——
call :print Reregister the BITS files and the Windows Update files.
cd /d %SYSTEMROOT%\system32
regsvr32.exe /s atl.dll
regsvr32.exe /s urlmon.dll
regsvr32.exe /s mshtml.dll
regsvr32.exe /s shdocvw.dll
regsvr32.exe /s browseui.dll
regsvr32.exe /s jscript.dll
regsvr32.exe /s vbscript.dll
regsvr32.exe /s scrrun.dll
regsvr32.exe /s msxml.dll
regsvr32.exe /s msxml3.dll
regsvr32.exe /s msxml6.dll
regsvr32.exe /s actxprxy.dll
regsvr32.exe /s softpub.dll
regsvr32.exe /s wintrust.dll
regsvr32.exe /s dssenh.dll
regsvr32.exe /s rsaenh.dll
regsvr32.exe /s gpkcsp.dll
regsvr32.exe /s sccbase.dll
regsvr32.exe /s slbcsp.dll
regsvr32.exe /s cryptdlg.dll
regsvr32.exe /s oleaut32.dll
regsvr32.exe /s ole32.dll
regsvr32.exe /s shell32.dll
regsvr32.exe /s initpki.dll
regsvr32.exe /s wuapi.dll
regsvr32.exe /s wuaueng.dll
regsvr32.exe /s wuaueng1.dll
regsvr32.exe /s wucltui.dll
regsvr32.exe /s wups.dll
regsvr32.exe /s wups2.dll
regsvr32.exe /s wuweb.dll
regsvr32.exe /s qmgr.dll
regsvr32.exe /s qmgrprxy.dll
regsvr32.exe /s wucltux.dll
regsvr32.exe /s muweb.dll
regsvr32.exe /s wuwebv.dll
:: —— Resetting Winsock ——
call :print Resetting Winsock.
netsh winsock reset
:: —— Resetting WinHTTP Proxy ——
call :print Resetting WinHTTP Proxy.
:: —— Set the startup type as automatic ——
call :print Resetting the services as automatics.
sc.exe config wuauserv start= auto
sc.exe config bits start= delayed-auto
sc.exe config cryptsvc start= auto
sc.exe config TrustedInstaller start= demand
sc.exe config DcomLaunch start= auto
:: —— Starting the Windows Update services ——
call :print Starting the Windows Update services.
net start bits
call :print Starting the Windows Update services.
net start wuauserv
call :print Starting the Windows Update services.
net start appidsvc
call :print Starting the Windows Update services.
net start cryptsvc
call :print Starting the Windows Update services.
net start DcomLaunch
:: —— End process ——
call :print The operation completed successfully.
Способ №4 Установка обновления вручную
.NET Framework 3.5 installation errors: 0x800F0906, 0x800F081F, 0x800F0907, 0x800F0922
Resolutions for Windows Server
Error code 0x800F0906
This error code occurs because the computer cannot download the required files from Windows Update.
To resolve this issue, use one of the following methods:
Method 1: Check your internet connection
This behavior can be caused by network, proxy, or firewall configurations or by network, proxy, or firewall failures. To fix this problem, try to connect to the Microsoft Update website.
If you cannot access this website, check your Internet connection, or contact the network administrator to determine whether there is a configuration that blocks access to the website.
Method 2: Configure the Group Policy setting
This behavior can also be caused by a system administrator who configures the computer to use Windows Server Update Services (WSUS) instead of the Windows Update server for servicing. In this case, contact your system administrator and request that they enable the Specify settings for optional component installation and component repair Group Policy setting and configure the Alternate source file path value or select the Contact Windows Update directly to download repair content instead of Windows Server Update Services (WSUS) option.
To configure the Group Policy setting, follow these steps:
Start the Local Group Policy Editor or Group Policy Management Console.
Point to the upper-right corner of the screen, click Search, type group policy, and then click Edit group policy.
Expand Computer Configuration, expand Administrative Templates, and then select System. The screenshot for this step is listed below.

Open the Specify settings for optional component installation and component repair Group Policy setting, and then select Enabled. The screenshot for this step is listed below.

If you want to specify an alternative source file, in the Alternate source file path box, specify a fully qualified path of a shared folder that contains the contents of the \sources\sxs folder from the installation media.
Example of a shared folder path: \\server_name\share\Win8sxs
Or, specify a WIM file. To specify a WIM file as an alternative source file location, add the prefix WIM: to the path, and then add the index of the image that you want to use in the WIM file as a suffix.
Example of a WIM file path: WIM:\\server_name\share\install.wim:3
In this example, 3 represents the index of the image in which the feature files are found.
If it is applicable to do this, select the Contact Windows Update directly to download repair content instead of Windows Server Update Services (WSUS) check box.
Tap or click OK.
Method 3: Use Windows installation media
Insert the Windows installation media.
At an elevated command prompt, run the following command:
In this command, is a placeholder for the drive letter for the DVD drive. For example, you run the following command:
Method 4: Alternative steps for Windows Server
In Windows Server 2012 R2, you can also specify an alternative source by using Windows PowerShell cmdlets or by using the Add Roles and Features Wizard.
To use Windows PowerShell, follow these steps:
Insert the Windows installation media.
In an elevated Windows PowerShell command window, run the following command:
In this command, is a placeholder for the drive letter for the DVD drive or for the Windows installation media. For example, you run the following command:
To use the Add Roles and Features Wizard, follow these steps:
Insert the Windows installation media.
Start the Add Roles and Features Wizard.
On the Select features page, select the .NET Framework 3.5 Features check box, and then click Next.
On the Confirm installation selections page, click the Specify an alternate source path link. The screenshot for this step is listed below.

On the Specify Alternate Source Path page, type the path of the SxS folder as a local path or as a network share path. The screenshot for this step is listed below.

Click OK.
Click Install to finish the wizard.
Error code 0x800F081F
This error code can occur when an alternative installation source is specified and one of the following conditions is true:
To fix this problem, make sure that the full path of the source is correct ( x:\sources\sxs ) and that you have at least Read access to the location. To do this, try to access the source directly from the affected computer. Verify that the installation source contains a valid and complete set of files. If the problem persists, try to use a different installation source.
Error code 0x800F0907
This error code occurs if an alternative installation source is not specified or is invalid and if the Specify settings for optional component installation and component repair Group Policy setting is configured to Never attempt to download payload from Windows Update.
To fix this problem, review the policy setting to determine whether it is appropriate for your environment. If you do not want to download feature payloads from Windows Update, consider configuring the Alternate source file path value in the Group policy setting.
You must be a member of the Administrators group to change Group Policy settings on the local computer. If the Group Policy settings for the computer that you want to manage are controlled at the domain level, contact your system administrator.
To do this, follow these steps:
Start Local Group Policy Editor or Group Policy Management Console as applicable in your environment.
Expand Computer Configuration, expand Administrative Templates, and then select System.
Open the Specify settings for optional component installation and component repair Group Policy setting, and then select Enabled.
Determine whether the Never attempt to download payload from Windows Update Group Policy setting is enabled, and then determine the desired setting for your environment.
If you want to specify an alternate source file, in the Alternate source file path box, specify a fully qualified path of a shared folder that contains the contents of the \sources\sxs folder from the installation media. Or, specify a WIM file. To specify a WIM file as an alternative source file location, add the prefix WIM: to the path, and then add the index of the image that you want to use in the WIM file as a suffix. The following are examples of values that you can specify:
If you want, select the Contact Windows Update directly to download repair content instead of Windows Server Update Services (WSUS) check box.
Tap or click OK.
Resolution for Windows 10
Error code 0x800F0906, 0x800F081F, or 0x800F0907
To fix the error codes for Windows 10, follow these steps:
Download the Windows Media Creation tool, and create an ISO image locally, or create an image for the version of Windows that you have installed.
Configure the Group Policy as in Method 2, but also follow these steps:
Error code 0x800F0922
The following error message occurs when you do Windows 10 upgrade:
0x800F0922 CBS_E_INSTALLERS_FAILED: Processing advanced installers and generic commands failed.
To fix this issue, follow these steps:
Open Sources folder.
Right-click the SXS folder, and then click Properties.
Click Security and make sure that there is a check mark next to Read & Execute. If the check mark isn’t there, click the Edit button and turn it on.
Press Windows Key + X keyboard shortcut.
Click Command Prompt (Admin).
In the Command Prompt window, type the following command and press Enter:
In the Command Prompt window, type the following command and press Enter:
More information
Error messages that are associated with these error codes
Windows couldn’t complete the requested changes.
Windows couldn’t connect to the Internet to download necessary files. Make sure that you’re connected to the Internet, and click Retry to try again.
Installation of one or more roles, role services, or features failed.
The source files could not be found. Try installing the roles, role services, or features again in a new Add Roles and Features Wizard session, and on the Confirmation page of the wizard, click Specify an alternate source path to specify a valid location of the source files that are required for the installation. The location must be accessible by the computer account of the destination server.
Error code: 0x800F0906
Error code: 0x800F081F
Error: 0x800F081F
For more information, review the log file.
The DISM log file can be found at C:\Windows\Logs\DISM\dism.log
Because of network policy settings, Windows couldn’t connect to the Internet to download files that are required to complete the requested changes. Contact your network administrator for more information.
Error code: 0x800F0907
Как исправить ошибку 0x800f080a обновления Windows 10 (РЕШЕНО)
6 способов исправить ошибку 0x800f080a при попытке установить обновление Windows 10.

Windows 10 получает обновления ОС довольно регулярно, и, возможно, это быстрое распространение исправлений от Microsoft является причиной избытка ошибок. Хотя большинство пакетов включают новые улучшения и исправления ошибок, к сожалению, бывают ситуации, когда их не удаётся установить. Ошибка 0x800f080a — это один из таких кодов, который появляется, когда ПК пытается установить накопительное обновление. В большинстве случаев начинается обновление, затем оно застревает на определённом проценте, а затем всё заканчивается неудачей.
Код ошибки обновления Windows 10 0x800f080a не препятствует установке всех обновлений; в основном это появляется для конкретной версии KB. Такие проблемы обычно возникают из-за повреждённых компонентов обновления Windows, сломанных или неправильно размещённых системных файлов, и остановленные службы обновления также могут вызывать то же самое.
Ошибка 0x800f080a при обновлении Windows 10
Вот как исправить ошибку обновления Windows 10 0x800f080a
Способ 1. Попробуйте заново запустить обновление
Просто нажмите кнопку «Повторить» и проверьте, удастся ли завершить обновление. В некоторых случаях такой простой метод действительно работает!

Способ 2: Запустите средство устранения неполадок Центра обновления Windows
Ошибки обновления довольно распространены в Windows 10, и именно по этой причине операционная система предоставляет средство устранения неполадок, предназначенное для решения этих проблем. Этот инструмент Fix-it помогает пользователям разрешить большинство фатальных ошибок, препятствующих установке обновлений. Для запуска утилиты нажмите Win+S.
Введите «Параметры устранения неполадок».
На правой панели щёлкните ссылку с надписью «Дополнительные средства устранения неполадок».
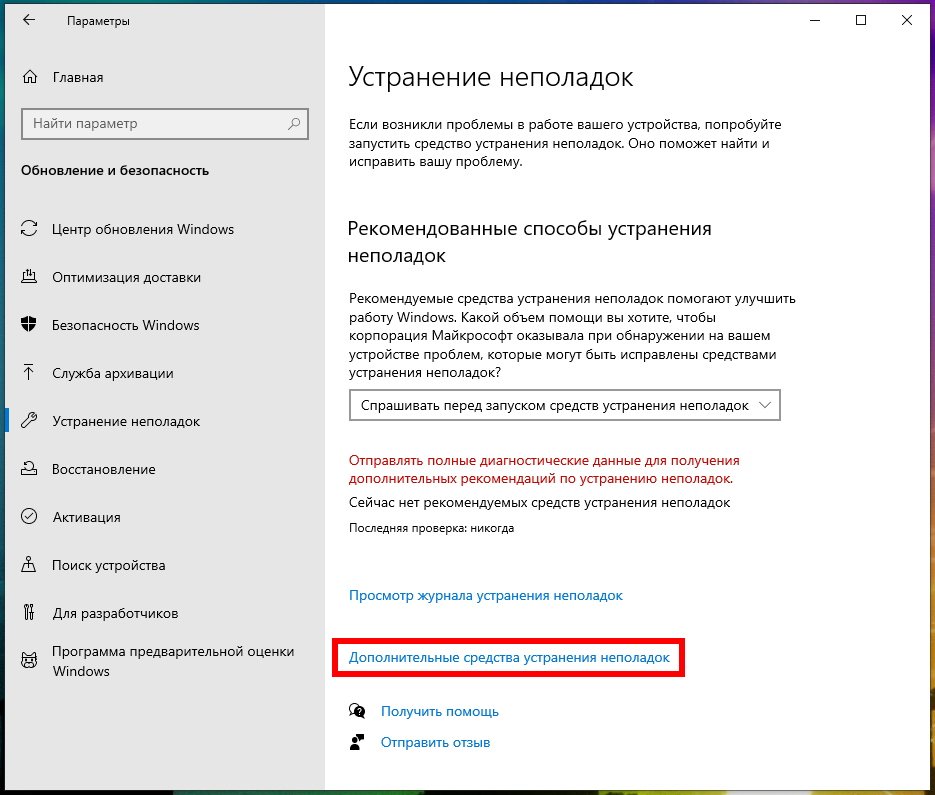
Выберите «Центр обновления Windows».

Щёлкните «Запустить средство устранения неполадок».

Следуйте инструкциям на экране, если таковые имеются.
Когда утилита обнаружит любую проблему и предложит решение, нажмите «Применить это исправление».
Закройте средство устранения неполадок.
Перезагрузите компьютер с Windows 10.
Способ 3: сбросить компоненты обновления, чтобы исправить 0x800f080a
Код ошибки обновления Windows 10 0x800f080a может появиться, если компоненты, связанные с агентом обновления, повреждены, и в этом случае требуется выполнение очистки компонентов. Этот способ чрезвычайно удобен для исправления почти всех проблем, возникающих при загрузке или установке исправлений или сборок.
Щёлкните кнопку «Пуск».
Введите «cmd».
Нажмите Ctrl+Shift+Enter.
При появлении запроса от User Account Control нажмите «Да».
В командной строке с повышенными привилегиями последовательно вставьте следующие команды и нажимайте Enter после каждой:
Вышеупомянутые команды остановят службы, связанные с обновлением Windows, переименуют существующую папку SoftwareDistribution и Catroot2 и создадут новую. Папка SoftwareDistribution хранит все временные файлы обновлений и помогает системе при необходимости выполнять процесс обновления.
С другой стороны, папка catroot2 резервирует сигнатуры патчей обновления, что помогает процессу установки. Обе папки играют важную роль в обеспечении бесперебойного процесса автоматического обновления Windows. Вот почему их сброс часто работает как корректировка ошибок обновления. Однако вам нужно снова запустить службы обновления, которые вы остановили ранее, поэтому выполните следующие команды:
Закройте командную строку.
Перезагрузите компьютер и проверьте, появляется ли ещё ошибка обновления.
Способ 4: проверьте службы обновления Windows
Службы обновления Windows по умолчанию имеют статус «Запущено» и отвечают за получение последних исправлений на вашем компьютере. Процесс тоже автономный. Когда какая-либо из служб отключена намеренно или случайно, система может вызвать код ошибки обновления 0x800f080a. Поскольку это критически важные компоненты Windows, которые помогают поддерживать ваш компьютер в актуальном состоянии с помощью жизненно важных исправлений безопасности, необходимо держать их включёнными.
Нажмите кнопку Пуск.
Введите «Службы».
Нажмите клавишу Enter.
Когда появится окно управления службами, найдите службу «Центр обновления Windows».

Дважды щёлкните на неё, чтобы открыть его свойства.

Установите для параметра Тип запуска значение Автоматический.
Если служба не запущена, нажмите «Запустить».
Перейдите на вкладку «Вход в систему».

Установите переключатель на «С системной учётной записью».
Снимите флажок перед «Разрешить взаимодействовать с рабочим столом».
После этого проверьте «Фоновую интеллектуальную службу передачи (RPC)», выполнив аналогичные шаги.
Способ 5: Устранение повреждений системы, чтобы исправить 0x800f080a
Системные элементы должны быть не повреждёнными, чтобы гарантировать правильность каждой операции, выполняемой Windows. Если какие-либо файлы пропадут или будут повреждены, могут возникнуть различные проблемы, включая ошибки обновления. Следовательно, вам необходимо убедиться, что ваша система случайно не повреждена. Если это произойдёт, System File Checker — лучший вариант для решения этой проблемы. Эта утилита командной строки помогает устранить существующие повреждения, а также восстановить недостающие элементы. Чтобы исправить такие проблемы, следуйте следующим шагам.
Нажмите клавишу Win.
Введите «cmd».
Выберите «Запуск от имени администратора» или нажмите Ctrl+Shift+Enter.
При запросе от User Account Control, нажмите — Да.
В командную строку вставьте
Как только процесс сканирования достигнет 100%, внимательно проверьте отчёт.
Если повреждение устранено, перезагрузите компьютер.
Может быть ситуация, когда средство проверки системных файлов не сможет исправить обнаруженное повреждение из-за каких-то неизвестных препятствий. В этом случае вам придётся использовать инструмент DISM. После того, как вы запустите эту утилиту в командной строке с повышенными привилегиями, она сканирует всю вашу систему, а также восстанавливает и готовит образ Windows, включая Windows RE, программу установки Windows и Windows PE.
Откройте командную строку от имени администратора.
После завершения процесса сканирования снова запустите команду
Способ 6: Загрузите и установите проблемную версию KB вручную
Обычно Windows 10 загружает и устанавливает исправления, созданные Microsoft, автоматически, если ваш компьютер подключён к активному интернет-соединению. Хотя процесс обычно проходит гладко, внезапные отключения электроэнергии и потеря Интернет-соединения могут помешать процедуре и в конечном итоге вызвать код ошибки обновления Windows 10 0x800f080a. Следовательно, попробуйте загрузить версию, которая выдавала код ошибки, вручную в удобное время. Шаги следующие.
Если вы ещё их не знаете, сначала проверьте характеристики ПК.
Там нажмите кнопку Update now:

Будет скачен небольшой файл, запустите его. Далее он проведёт по процессу обновления, скачает новую версию (несколько гигабайт), выполнит проверки и начнёт установку в фоне. Часть установки может быть выполнена только при перезагрузке — когда программа дойдёт до этого момента она предложит перезагрузиться или сделать это попозже. Вы можете продолжить работу и отложить перезагрузку. Когда вы готовы, перезагрузить компьютер и оставьте его в покое до тех пор, пока он сам не загрузиться до рабочего стола. Процесс обновления сильно зависит от производительности вашего компьютера и скорости жёсткого диска — на медленных системах это может занять действительного много времени — как установка новой системы.