Первая программа. Среда разработки IDLE
Сегодня мы напишем свою первую программу в среде разработки IDLE.
После загрузки и установки python открываем IDLE (среда разработки на языке Python, поставляемая вместе с дистрибутивом).
Здесь и далее буду приводить примеры под ОС Windows, так как именно она у меня сейчас под рукой.
Запускаем IDLE (изначально запускается в интерактивном режиме), после чего уже можно начинать писать первую программу. Традиционно, первой программой у нас будет «hello world».
Чтобы написать «hello world» на python, достаточно всего одной строки:
Вводим этот код в IDLE и нажимаем Enter. Результат виден на картинке:
Поздравляю! Вы написали свою первую программу на python! (если что-то не работает).
С интерактивным режимом мы немного познакомились, можете с ним ещё поиграться, например, написать
Но, всё-таки, интерактивный режим не будет являться основным. В основном, вы будете сохранять программный код в файл и запускать уже файл.
Для того, чтобы создать новое окно, в интерактивном режиме IDLE выберите File → New File (или нажмите Ctrl + N).
В открывшемся окне введите следующий код:
Первая строка печатает вопрос («Как Вас зовут? «), ожидает, пока вы не напечатаете что-нибудь и не нажмёте Enter и сохраняет введённое значение в переменной name.
Во второй строке мы используем функцию print для вывода текста на экран, в данном случае для вывода «Привет, » и того, что хранится в переменной «name».
Теперь нажмём F5 (или выберем в меню IDLE Run → Run Module) и убедимся, что то, что мы написали, работает. Перед запуском IDLE предложит нам сохранить файл. Сохраним туда, куда вам будет удобно, после чего программа запустится.
Поздравляю! Вы научились писать простейшие программы, а также познакомились со средой разработки IDLE. Теперь можно немного отдохнуть, а потом начать изучать python дальше. Можете посмотреть синтаксис python, циклы или условия. Желаю удачи!
Пример простой программы на Python – пишем с нуля
В этом разделе мы обсудим основной синтаксис и разберем пример Python – запустим простую программу для печати Hello World на консоли.
Python предоставляет нам два способа запуска программы:
Давайте подробно обсудим каждый из них.
Интерактивная подсказка помощника
Python предоставляет нам возможность выполнять инструкции интерактивного помощника. Это предпочтительнее в том случае, когда нас беспокоит вывод каждой строки программы Python.
Чтобы использовать интерактивный режим, откройте терминал(или командную строку) и введите python(python3 в случае, если в вашей системе установлены Python2 и Python3).
Откроется следующее приглашение, в котором мы можем выполнить оператор Python и проверить влияние на консоль.

После написания отчета о печати нажмите клавишу Enter.

Здесь мы получаем сообщение “Hello World!” на консоли.
Использование файла сценария(Программирование в режиме сценария)
Подсказка интерпретатора лучше всего подходит для выполнения однострочных операторов кода. Однако мы не можем писать код каждый раз на терминале. Не рекомендуется писать несколько строк кода.
Чтобы запустить этот файл с именем first.py, нам нужно запустить следующую команду на терминале.

Шаг – 1: Откройте интерактивную оболочку Python и нажмите «Файл», затем выберите «Создать», откроется новый пустой скрипт, в котором мы можем написать наш код.

Шаг 2: Теперь напишите код и нажмите «Ctrl + S», чтобы сохранить файл.

Шаг – 3: После сохранения кода мы можем запустить его, нажав «Выполнить» или «Выполнить модуль». Он отобразит вывод в оболочку.

Результат будет показан следующим образом.

Шаг – 4: Кроме того, мы также можем запустить файл с помощью терминала операционной системы. Но мы должны знать путь к каталогу, в котором мы сохранили наш файл.


Многострочные операторы


Плюсы и минусы режима сценария
Режим сценария также имеет несколько преимуществ и недостатков. Давайте разберемся в следующих преимуществах запуска кода в режиме скрипта:
Посмотрим на недостатки скриптового режима:
Начало работы с PyCharm
В нашей первой программе мы использовали gedit в CentOS в качестве редактора. В Windows у нас есть альтернатива, например блокнот или блокнот ++, для редактирования кода. Однако эти редакторы не используются в качестве IDE для Python, поскольку они не могут отображать предложения, связанные с синтаксисом.
JetBrains предоставляет самую популярную и широко используемую кроссплатформенную IDE PyCharm для запуска программ Python.
Установка PyCharm
Как мы уже говорили, PyCharm – это кроссплатформенная IDE, поэтому ее можно установить в различных операционных системах. В этом разделе руководства мы рассмотрим процесс установки PyCharm в Windows, MacOS, CentOS и Ubuntu.
Windows
Установить PyCharm в Windows очень просто. Чтобы установить PyCharm в операционной системе Windows, перейдите по ссылке https://www.jetbrains.com/pycharm/download/download-thanks.html?platform=windows, чтобы загрузить установщика. Дважды щелкните файл установки(.exe) и установите PyCharm, нажимая «Далее» на каждом шаге.
Чтобы создать первую программу для Pycharm, выполните следующий шаг.
Шаг – 1. Откройте редактор Pycharm. Нажмите на «Создать новый проект», чтобы создать новый проект.

Шаг – 2. Выберите место для сохранения проекта.

Шаг – 3. Щелкните меню «Файл» и выберите «Новый». При нажатии на опцию «Новый» он покажет различные форматы файлов. Выберите «Файл Python».

Шаг – 4. Теперь введите имя файла Python и нажмите «ОК». Мы написали «Первую программу».

Шаг – 5. Теперь введите первую программу – print(«Hello World»), затем нажмите меню «Выполнить», чтобы запустить программу.

Шаг – 6. Результат появится внизу экрана.

Базовый синтаксис Python
Отступы в Python
Отступы – наиболее важная концепция языка программирования Python. Неправильное использование отступов приведет к ошибке “IndentationError” в нашем коде.
Отступы – это не что иное, как добавление пробелов перед оператором, когда это необходимо. Без отступа Python не знает, какой оператор выполнять следующим. Отступ также определяет, какие операторы принадлежат какому блоку. Если нет отступа или отступ неправильный, отобразится «IndentationError» и прервет наш код.

Отступы Python определяют, какая группа операторов принадлежит конкретному блоку. В языках программирования, таких как C, C ++, java, для определения блоков кода используются фигурные скобки <>.
В Python операторы, находящиеся на одном уровне справа, принадлежат одному блоку. Мы можем использовать четыре пробела для определения отступа. Давайте посмотрим на следующие строки кода.
В приведенном выше коде цикл for имеет блоки кода, если оператор имеет блок кода внутри цикла for. Оба с четырьмя пробелами с отступом. Последний оператор print() без отступа; это означает, что он не принадлежит циклу for.
Комментарии в Python
Комментарии необходимы для определения кода и помогают нам и другим людям понять код. Просматривая комментарий, мы можем легко понять назначение каждой строки, написанной нами в коде. Мы также можем очень легко найти ошибки, исправить их и использовать в других приложениях.
В Python мы можем применять комментарии, используя символ решетки #. Интерпретатор Python полностью игнорирует строки, за которыми следует символ решетки. Хороший программист всегда использует комментарии, чтобы сделать код стабильным. Давайте посмотрим на следующий пример комментария.
Мы можем добавить комментарий в каждую строку кода Python.
Хорошая идея – добавить код в любую строку раздела кода, цель которого неочевидна. Это лучший способ изучить при написании кода.
Типы комментариев
Python предоставляет возможность писать комментарии двумя способами – однострочный комментарий и многострочный комментарий.
Однострочный комментарий начинается с символа решетки #, за которым следует текст для дальнейшего объяснения.
Мы также можем написать комментарий рядом с оператором кода. Рассмотрим следующий пример.
Многострочные комментарии – Python не имеет явной поддержки многострочных комментариев, но мы можем использовать символ решетки # для нескольких строк. Например –
Мы также можем использовать другой способ.
Это основное введение в комментарии. Просмотрите наш урок по комментариям Python, чтобы изучить его подробно.
Идентификаторы Python
Идентификаторы Python относятся к имени, используемому для идентификации переменной, функции, модуля, класса, модуля или других объектов. Есть несколько правил, которым нужно следовать при присвоении имени переменной Python.
Мы определили базовый синтаксис языка программирования Python. Мы должны ознакомиться с основной концепцией любого языка программирования. Как только мы запомним концепции, упомянутые выше, изучение Python станет проще.
Как написать Hello World на Python

Продолжаем изучать основы программирования и в данной статье рассмотрим создание первой программы и узнаем, как как написать Hello World на Python.
Если у вас еще не установлен интерпретатор, то вначале ознакомьтесь со статьей как установить Python.
Hello World! в командной строке
Запускаем командную строку, нажав комбинацию Win+R, введя аббревиатуру cmd и нажав ОК.
В открывшейся командной строке вводим

Затем вызываем функцию print и передаем ей строку Hello, World!

Писать код прямо в командной строке неудобно, поэтому существуют специальные редакторы кода.
Hello, World! в IDLE
В стандартный дистрибутив Пайтона входит редактор IDLE, в котором можно писать и запускать код.
Как запустить IDLE
Необходимо зайти в папку с питоном, затем в папку Lib и idlelib и найти файл idle.pyw
Откроется окно редактора, в целом похожее на командную строку, но с уже запущенным Пайтоном, поэтому вводить команду python нет необходимости.

Вновь вводим наш код:

Выглядит гораздо лучше, не правда ли? Есть и подсветка кода, и всплывающие подсказки.
Вывод
Таким образом мы написали и запустили на выполнение нашу первую программу Hello World на Python, которая состоит всего из одной функции print(), которая принимает в качестве параметра строку «Hello, World!» и выводит ее на экран. Хотя в IDLE вполне можно писать полностью функциональные программы, но гораздо удобнее делать это в специальной среде разработки или IDE (Integrated Development Environment). Какие они бывают и какую выбрать и использовать — поговорим в следующих статьях. Также мы поговорим о том, что такое функции, строки и прочие элементы языка Python.
Getting Started with Python in VS Code
In this tutorial, you use Python 3 to create the simplest Python «Hello World» application in Visual Studio Code. By using the Python extension, you make VS Code into a great lightweight Python IDE (which you may find a productive alternative to PyCharm).
This tutorial introduces you to VS Code as a Python environment, primarily how to edit, run, and debug code through the following tasks:
This tutorial is not intended to teach you Python itself. Once you are familiar with the basics of VS Code, you can then follow any of the programming tutorials on python.org within the context of VS Code for an introduction to the language.
If you have any problems, feel free to file an issue for this tutorial in the VS Code documentation repository.
Prerequisites
To successfully complete this tutorial, you need to first setup your Python development environment. Specifically, this tutorial requires:
Install Visual Studio Code and the Python Extension
If you have not already done so, install VS Code.
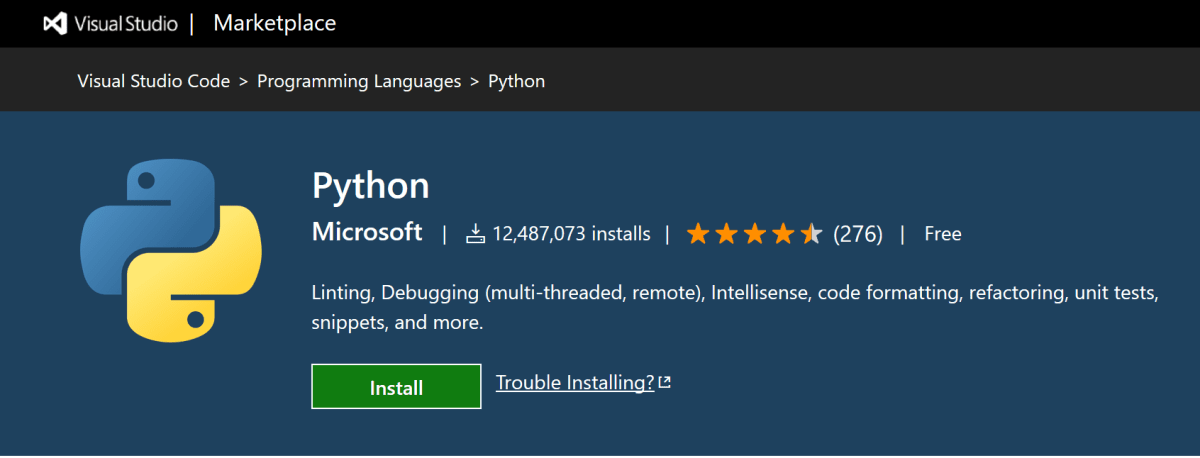
Next, install the Python extension for VS Code from the Visual Studio Marketplace. For additional details on installing extensions, see Extension Marketplace. The Python extension is named Python and it’s published by Microsoft.
Install a Python interpreter
Along with the Python extension, you need to install a Python interpreter. Which interpreter you use is dependent on your specific needs, but some guidance is provided below.
Windows
Install Python from python.org. You can typically use the Download Python button that appears first on the page to download the latest version.
Note: If you don’t have admin access, an additional option for installing Python on Windows is to use the Microsoft Store. The Microsoft Store provides installs of Python 3.7, Python 3.8, and Python 3.9. Be aware that you might have compatibility issues with some packages using this method.
For additional information about using Python on Windows, see Using Python on Windows at Python.org
macOS
The system install of Python on macOS is not supported. Instead, an installation through Homebrew is recommended. To install Python using Homebrew on macOS use brew install python3 at the Terminal prompt.
Note On macOS, make sure the location of your VS Code installation is included in your PATH environment variable. See these setup instructions for more information.
Linux
The built-in Python 3 installation on Linux works well, but to install other Python packages you must install pip with get-pip.py.
Other options
Data Science: If your primary purpose for using Python is Data Science, then you might consider a download from Anaconda. Anaconda provides not just a Python interpreter, but many useful libraries and tools for data science.
Verify the Python installation
To verify that you’ve installed Python successfully on your machine, run one of the following commands (depending on your operating system):
Linux/macOS: open a Terminal Window and type the following command:
Windows: open a command prompt and run the following command:
If the installation was successful, the output window should show the version of Python that you installed.
Start VS Code in a project (workspace) folder
Note: If you’re using an Anaconda distribution, be sure to use an Anaconda command prompt.
Alternately, you can run VS Code through the operating system UI, then use File > Open Folder to open the project folder.
Select a Python interpreter
Python is an interpreted language, and in order to run Python code and get Python IntelliSense, you must tell VS Code which interpreter to use.
From within VS Code, select a Python 3 interpreter by opening the Command Palette ( ⇧⌘P (Windows, Linux Ctrl+Shift+P ) ), start typing the Python: Select Interpreter command to search, then select the command. You can also use the Select Python Environment option on the Status Bar if available (it may already show a selected interpreter, too):

The command presents a list of available interpreters that VS Code can find automatically, including virtual environments. If you don’t see the desired interpreter, see Configuring Python environments.
Selecting an interpreter sets which interpreter will be used by the Python extension for that workspace.
Note: If you select an interpreter without a workspace folder open, VS Code sets python.defaultInterpreterPath in User scope instead, which sets the default interpreter for VS Code in general. The user setting makes sure you always have a default interpreter for Python projects. The workspace settings lets you override the user setting.
Create a Python Hello World source code file
From the File Explorer toolbar, select the New File button on the hello folder:
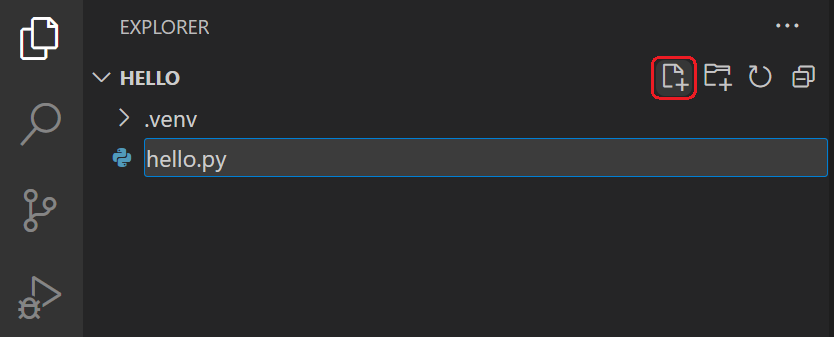
Note: The File Explorer toolbar also allows you to create folders within your workspace to better organize your code. You can use the New folder button to quickly create a folder.
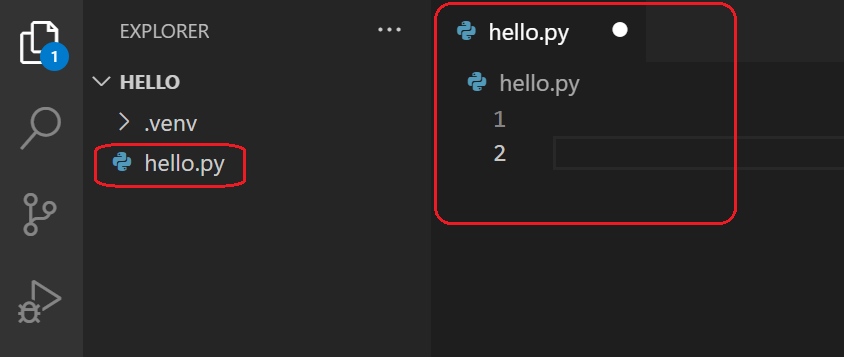
Now that you have a code file in your Workspace, enter the following source code in hello.py :
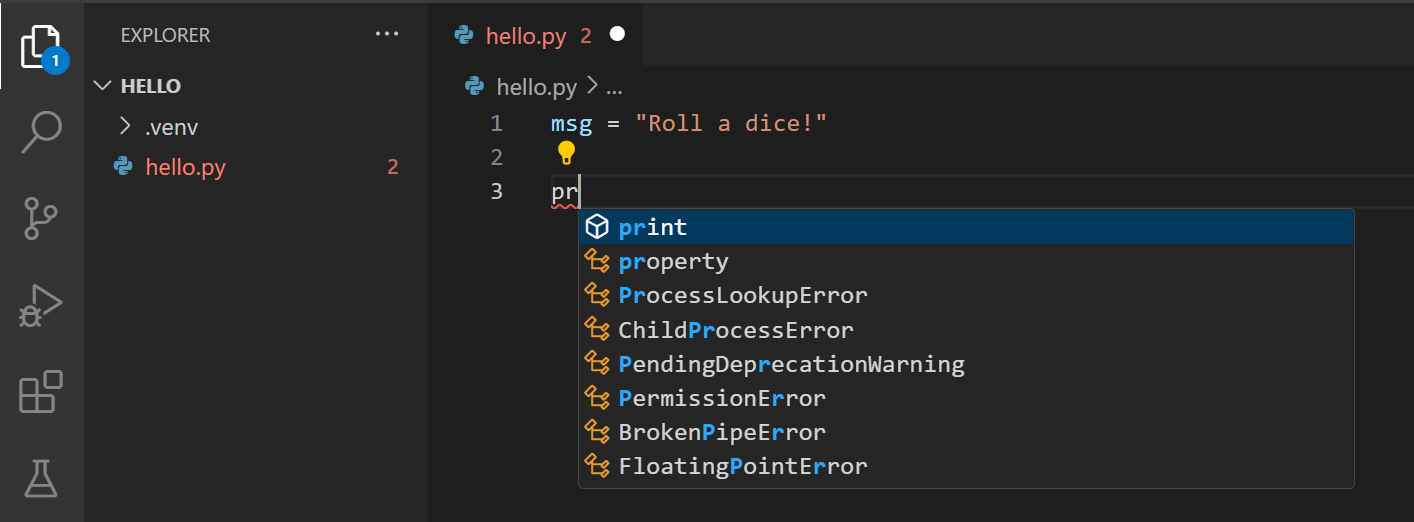
IntelliSense and auto-completions work for standard Python modules as well as other packages you’ve installed into the environment of the selected Python interpreter. It also provides completions for methods available on object types. For example, because the msg variable contains a string, IntelliSense provides string methods when you type msg. :
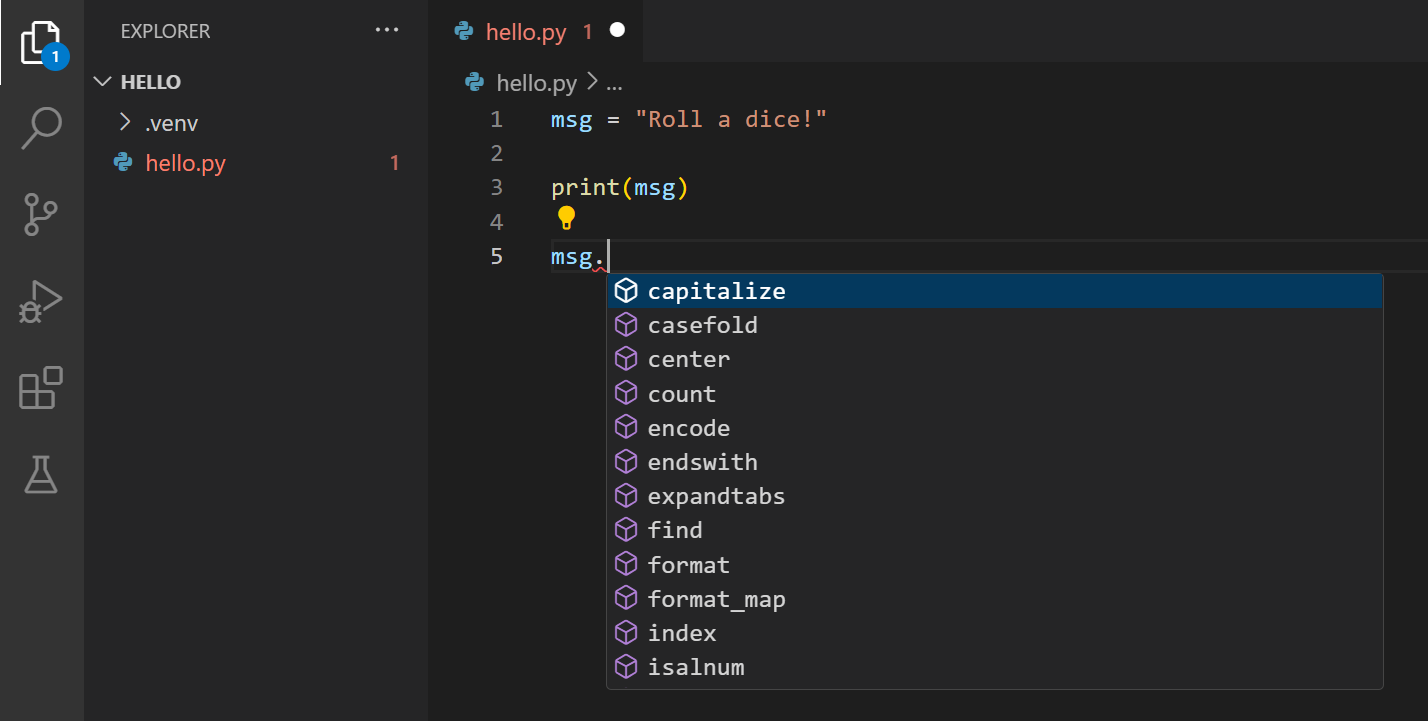
Feel free to experiment with IntelliSense some more, but then revert your changes so you have only the msg variable and the print call, and save the file ( ⌘S (Windows, Linux Ctrl+S ) ).
For full details on editing, formatting, and refactoring, see Editing code. The Python extension also has full support for Linting.
Run Hello World
It’s simple to run hello.py with Python. Just click the Run Python File in Terminal play button in the top-right side of the editor.
The button opens a terminal panel in which your Python interpreter is automatically activated, then runs python3 hello.py (macOS/Linux) or python hello.py (Windows):

There are three other ways you can run Python code within VS Code:
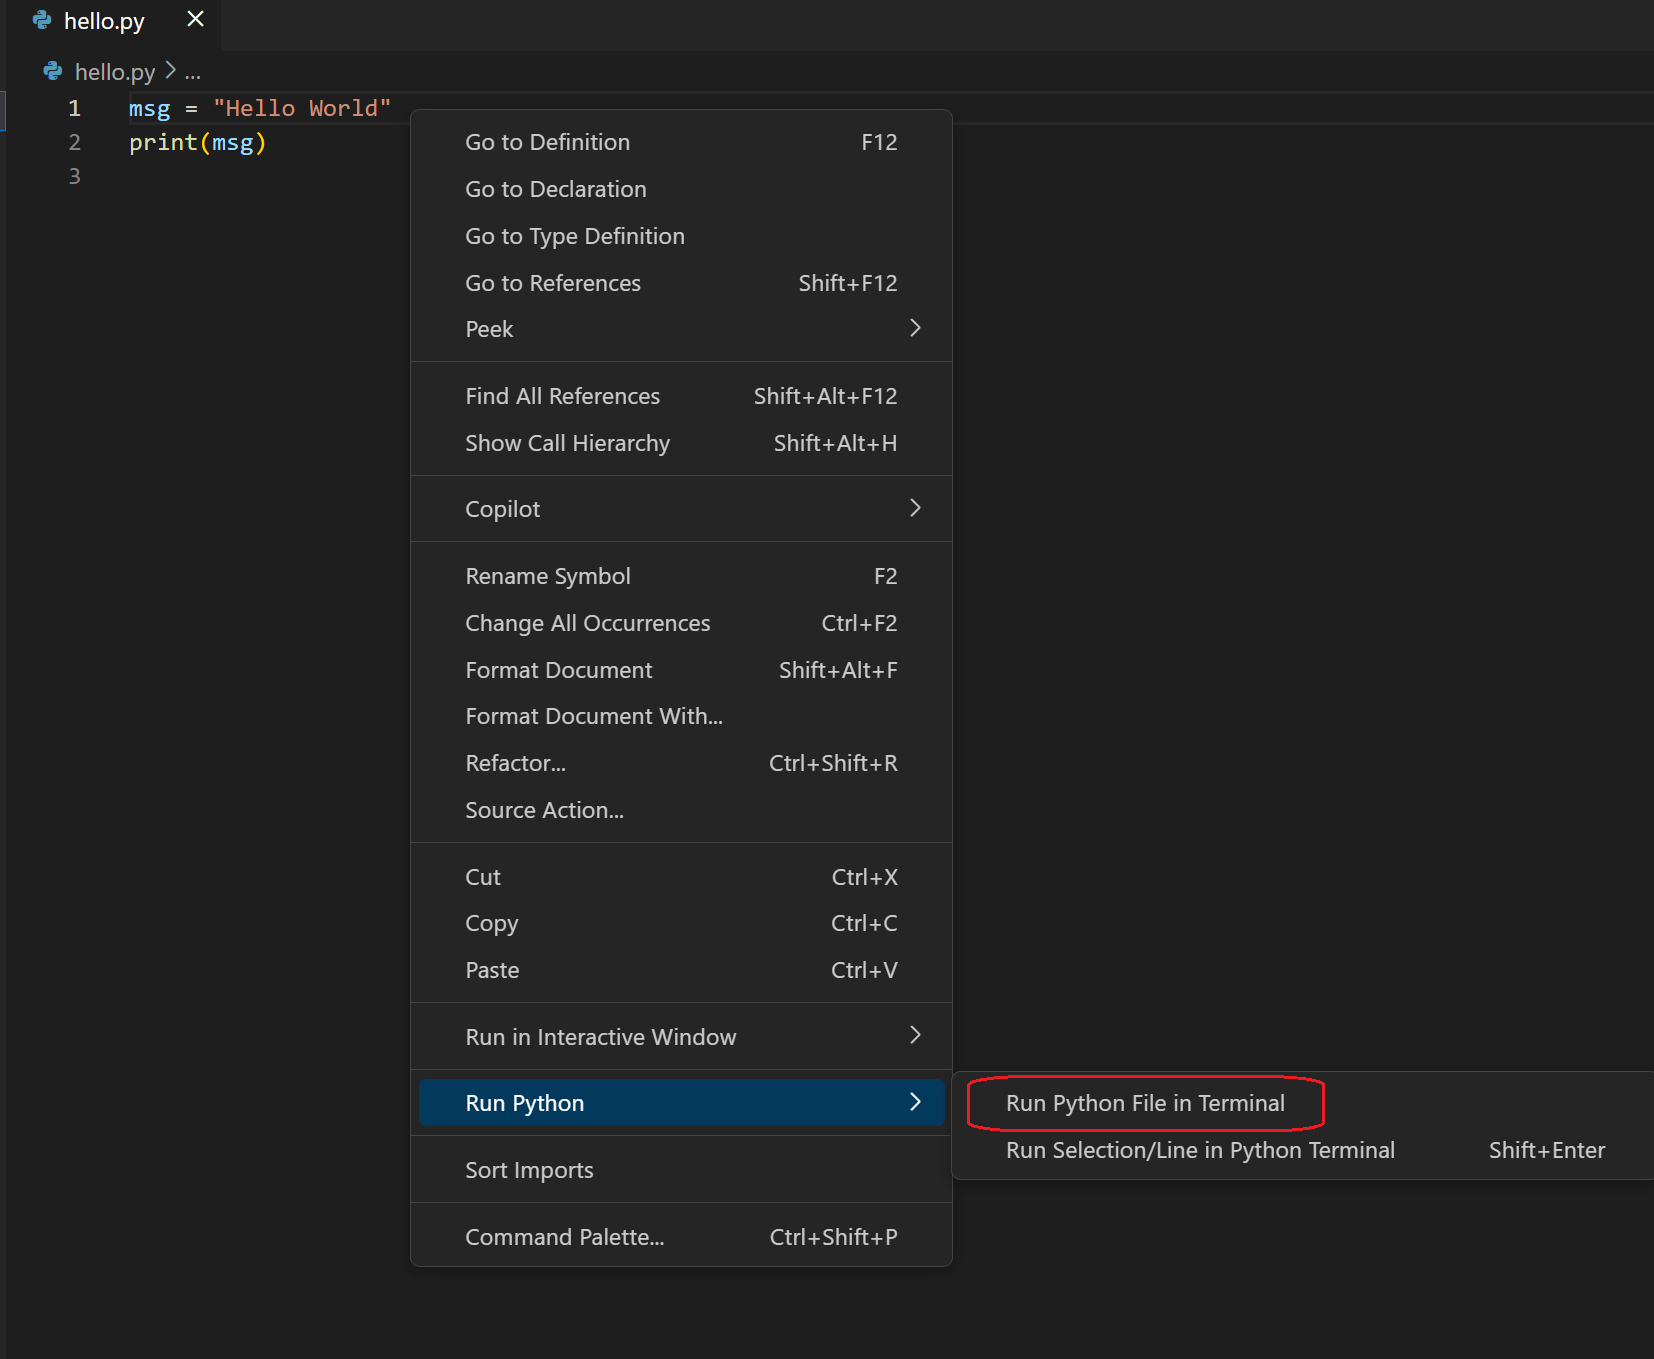
Right-click anywhere in the editor window and select Run Python File in Terminal (which saves the file automatically):
Select one or more lines, then press Shift+Enter or right-click and select Run Selection/Line in Python Terminal. This command is convenient for testing just a part of a file.
From the Command Palette ( ⇧⌘P (Windows, Linux Ctrl+Shift+P ) ), select the Python: Start REPL command to open a REPL terminal for the currently selected Python interpreter. In the REPL, you can then enter and run lines of code one at a time.
Configure and run the debugger
Let’s now try debugging our simple Hello World program.

Note: VS Code uses JSON files for all of its various configurations; launch.json is the standard name for a file containing debugging configurations.
These different configurations are fully explained in Debugging configurations; for now, just select Python File, which is the configuration that runs the current file shown in the editor using the currently selected Python interpreter.
You can also start the debugger by clicking on the down-arrow next to the run button on the editor, and selecting Debug Python File in Terminal.
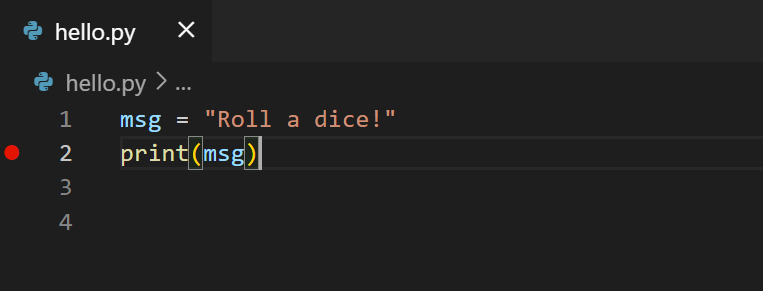
The debugger will stop at the first line of the file breakpoint. The current line is indicated with a yellow arrow in the left margin. If you examine the Local variables window at this point, you will see now defined msg variable appears in the Local pane.
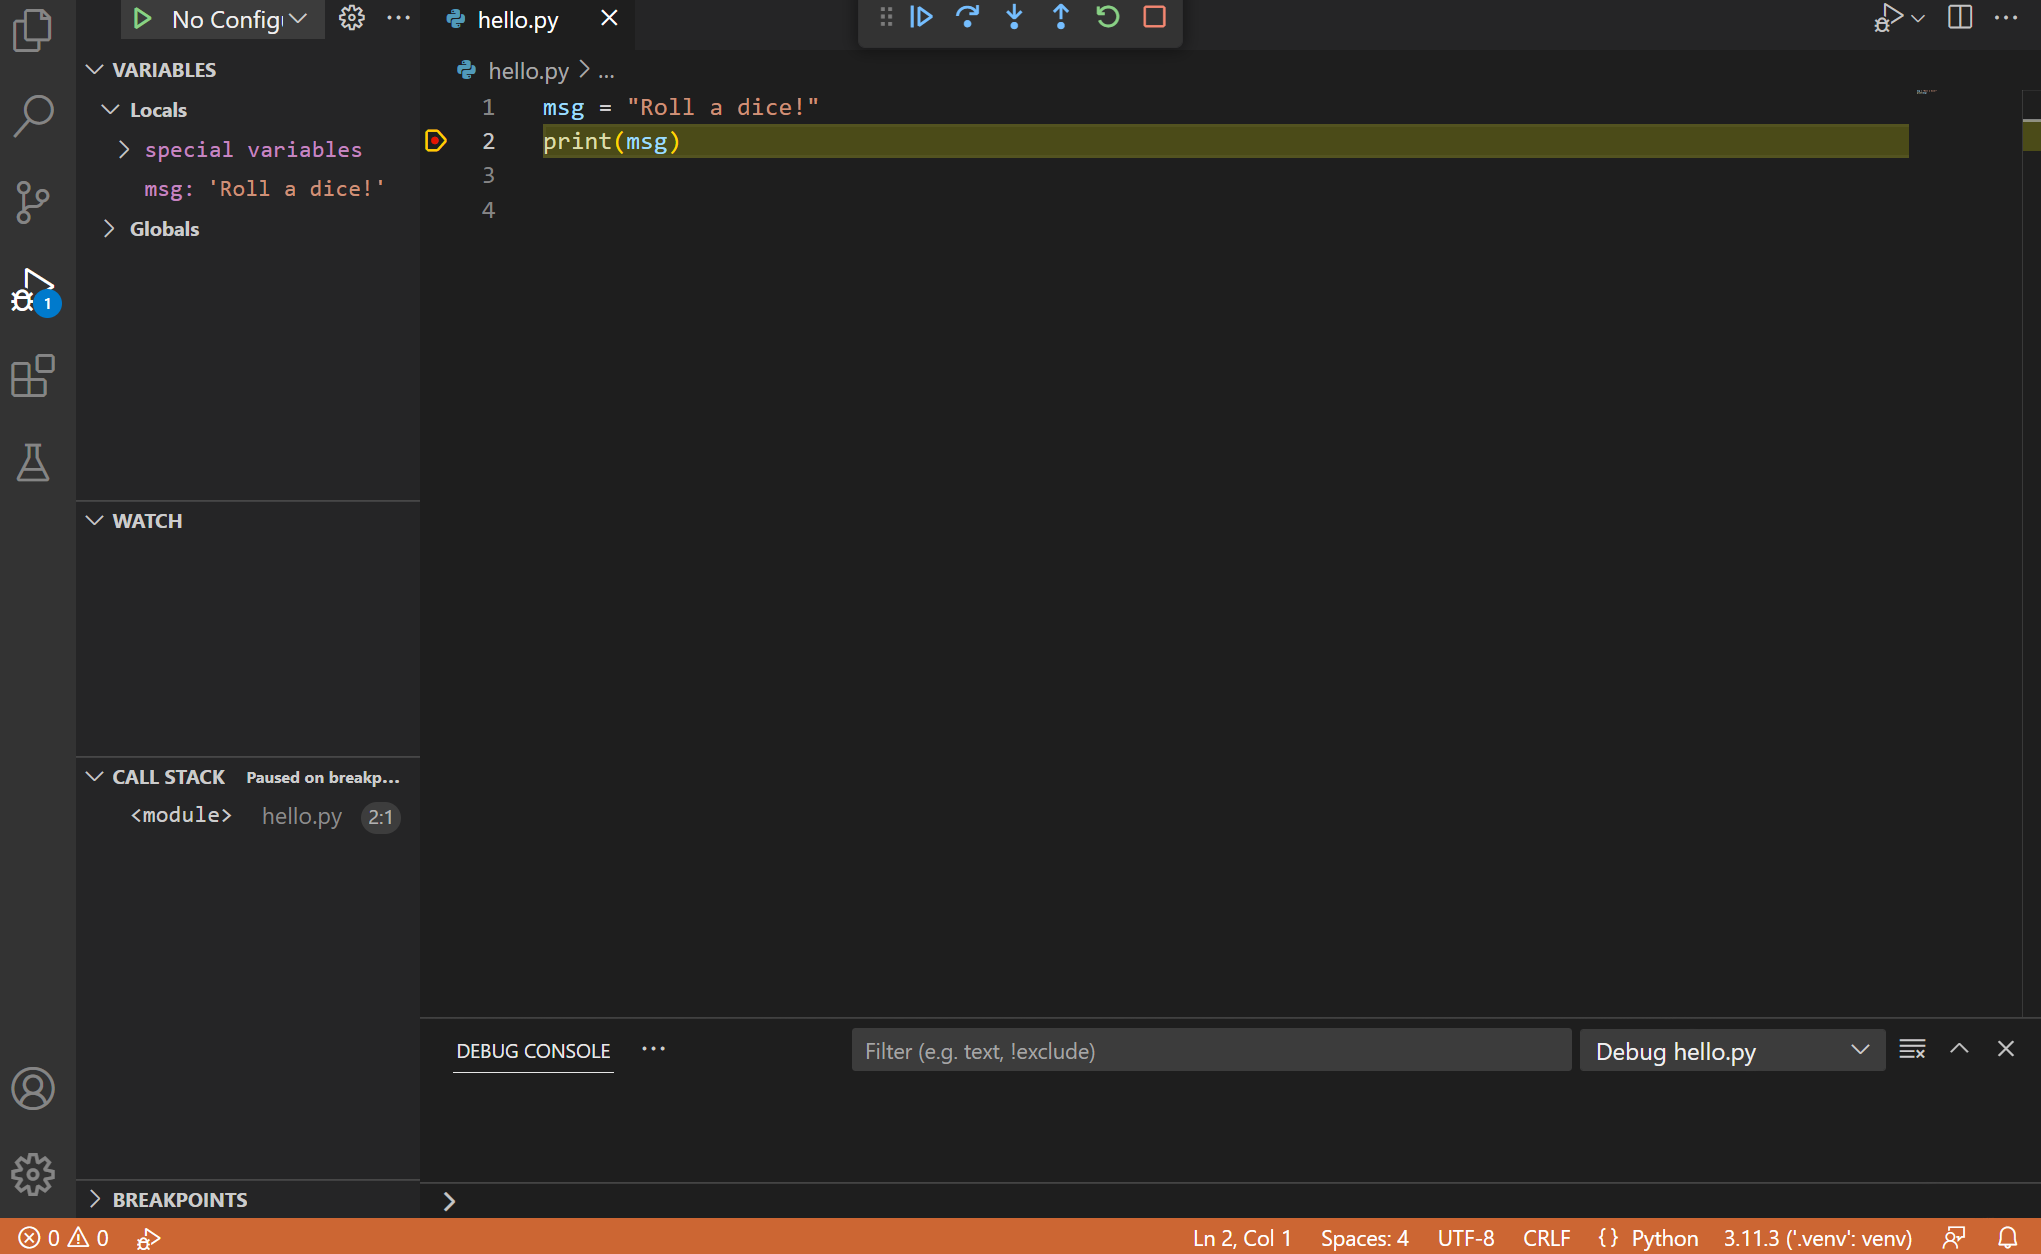
A debug toolbar appears along the top with the following commands from left to right: continue ( F5 ), step over ( F10 ), step into ( F11 ), step out ( ⇧F11 (Windows, Linux Shift+F11 ) ), restart ( ⇧⌘F5 (Windows, Linux Ctrl+Shift+F5 ) ), and stop ( ⇧F5 (Windows, Linux Shift+F5 ) ).

The Status Bar also changes color (orange in many themes) to indicate that you’re in debug mode. The Python Debug Console also appears automatically in the lower right panel to show the commands being run, along with the program output.
To continue running the program, select the continue command on the debug toolbar ( F5 ). The debugger runs the program to the end.
You can also work with variables in the Debug Console (If you don’t see it, select Debug Console in the lower right area of VS Code, or select it from the . menu.) Then try entering the following lines, one by one, at the > prompt at the bottom of the console:

Select the blue Continue button on the toolbar again (or press F5) to run the program to completion. «Hello World» appears in the Python Debug Console if you switch back to it, and VS Code exits debugging mode once the program is complete.
If you restart the debugger, the debugger again stops on the first breakpoint.
To stop running a program before it’s complete, use the red square stop button on the debug toolbar ( ⇧F5 (Windows, Linux Shift+F5 ) ), or use the Run > Stop debugging menu command.
For full details, see Debugging configurations, which includes notes on how to use a specific Python interpreter for debugging.
Tip: Use Logpoints instead of print statements: Developers often litter source code with print statements to quickly inspect variables without necessarily stepping through each line of code in a debugger. In VS Code, you can instead use Logpoints. A Logpoint is like a breakpoint except that it logs a message to the console and doesn’t stop the program. For more information, see Logpoints in the main VS Code debugging article.
Install and use packages
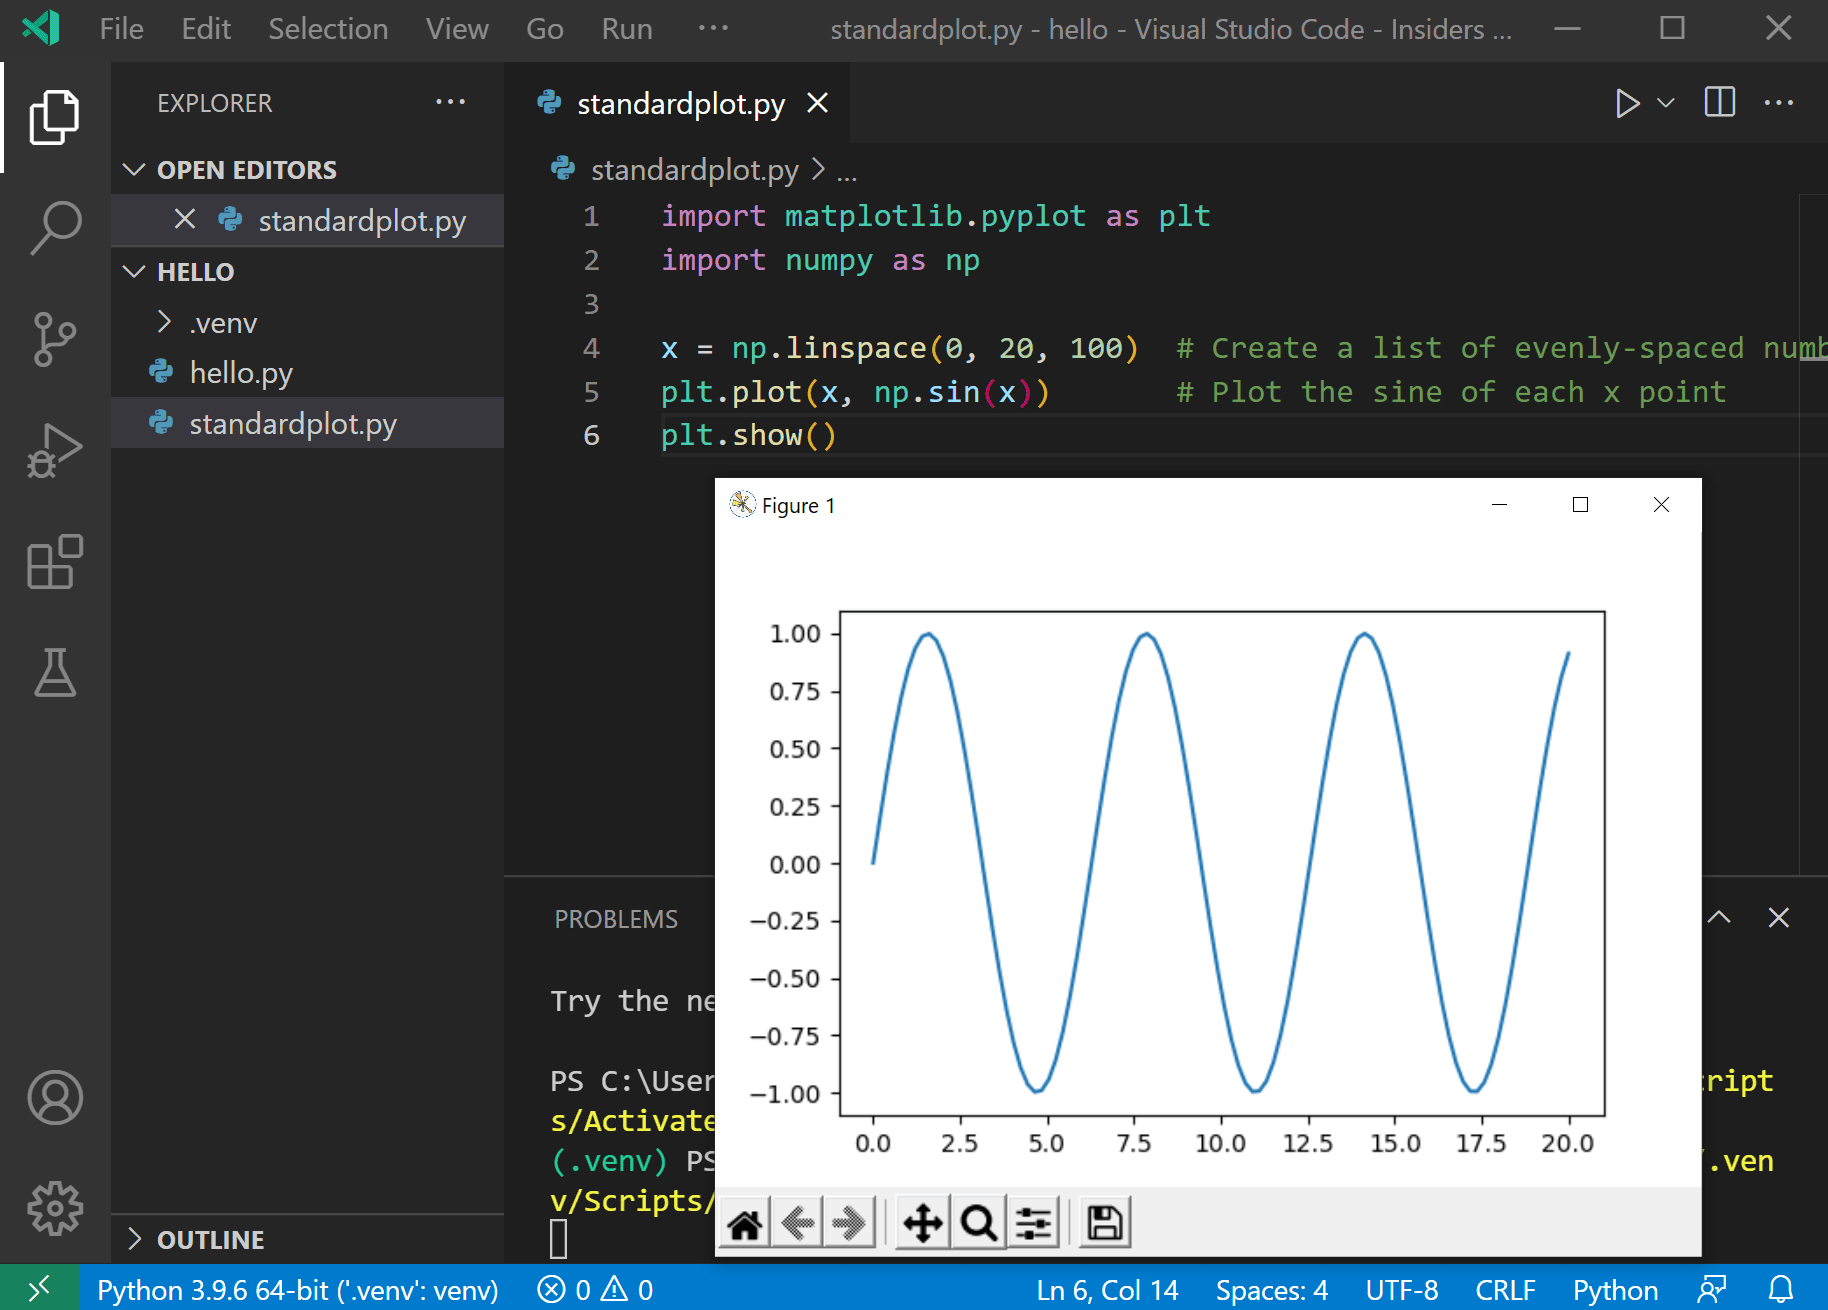
Let’s now run an example that’s a little more interesting. In Python, packages are how you obtain any number of useful code libraries, typically from PyPI. For this example, you use the matplotlib and numpy packages to create a graphical plot as is commonly done with data science. (Note that matplotlib cannot show graphs when running in the Windows Subsystem for Linux as it lacks the necessary UI support.)
Next, try running the file in the debugger using the «Python: Current file» configuration as described in the last section.
Unless you’re using an Anaconda distribution or have previously installed the matplotlib package, you should see the message, «ModuleNotFoundError: No module named ‘matplotlib'». Such a message indicates that the required package isn’t available in your system.
To install the matplotlib package (which also installs numpy as a dependency), stop the debugger and use the Command Palette to run Terminal: Create New Terminal ( ⌃⇧` (Windows, Linux Ctrl+Shift+` ) ). This command opens a command prompt for your selected interpreter.
A best practice among Python developers is to avoid installing packages into a global interpreter environment. You instead use a project-specific virtual environment that contains a copy of a global interpreter. Once you activate that environment, any packages you then install are isolated from other environments. Such isolation reduces many complications that can arise from conflicting package versions. To create a virtual environment and install the required packages, enter the following commands as appropriate for your operating system:
Note: For additional information about virtual environments, see Environments.
Create and activate the virtual environment
Note: When you create a new virtual environment, you should be prompted by VS Code to set it as the default for your workspace folder. If selected, the environment will automatically be activated when you open a new terminal.

For Windows
If the activate command generates the message «Activate.ps1 is not digitally signed. You cannot run this script on the current system.», then you need to temporarily change the PowerShell execution policy to allow scripts to run (see About Execution Policies in the PowerShell documentation):
For macOS/Linux
Select your new environment by using the Python: Select Interpreter command from the Command Palette.
Install the packages
Rerun the program now (with or without the debugger) and after a few moments a plot window appears with the output:
Once you are finished, type deactivate in the terminal window to deactivate the virtual environment.
For additional examples of creating and activating a virtual environment and installing packages, see the Django tutorial and the Flask tutorial.
Next steps
You can configure VS Code to use any Python environment you have installed, including virtual and conda environments. You can also use a separate environment for debugging. For full details, see Environments.
To learn more about the Python language, follow any of the programming tutorials listed on python.org within the context of VS Code.
To learn to build web apps with the Django and Flask frameworks, see the following tutorials:
There is then much more to explore with Python in Visual Studio Code: