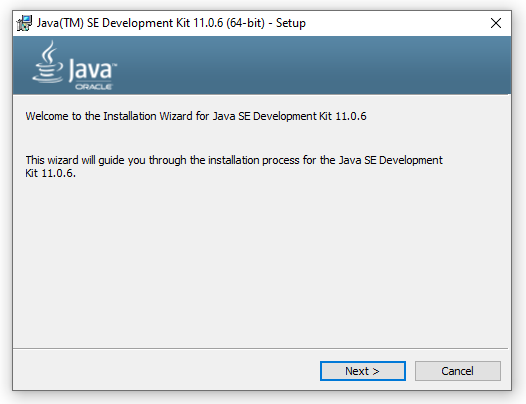
Установка Java (JDK) в Windows и Linux, переменная PATH и JAVA_HOME
Давайте проясним несколько вещей перед тем, как мы начнем.
Установка Java (JDK) в Windows
Первым делом необходимо скачать JDK с официальной страницы Oracle. В нашем случае нужна версия под Windows, в самом низу.
После установки запустите скачанный exe-файл и установите его на ваш компьютер. Как только вы это сделаете, нужно будет настроить окружение.


Теперь нужно найти и дополнить переменную PATH так, чтобы она содержала путь до установленной Java. Выберите PATH и нажмите «Изменить»:

Вы увидите список уже установленных переменных. Сейчас необходимо нажать «Новый» и добавить путь, по которому установлена Java (каталог bin!). По умолчанию это обычно «C:\Program Files(x86)\Java\jdk\bin».

Нажмите «Готово» (или «Ок»), сохраните настройки и на этом всё готово! Чтобы проверить, что установка прошла корректно, откройте консоль и введите:
Если вы получили сведения о версии Java, значит всё хорошо.
Установка Java (JDK) на Linux
Откройте терминал и напишите команду для установки пакета:
Чтобы прописать JAVA_HOME в окружение, выполните следующую команду (только убедитесь, что такой каталог уже есть):
Чтобы прописать компилятор Java в PATH, выполните другую команду (опять же, ваши пути до Java могут отличаться от моих):
На этом установка закончена. Чтобы проверить, что всё работает правильно, достаточно написать в терминале:
О том, как же всё-таки писать на Java, мы расскажем в следующий раз.
Установка JDK в Windows
В этой статье мы установим JDK 11 на Windows. Java Development Kit (JDK) – это набор программ и библиотек для разработки программ на Java. Если вы хотите разрабатывать на Java программы, сперва вам нужно установить актуальную версию JDK.
В данной статье мы покажем, как установить JDK 11. Эта версия LTS (long time support), которая будет поддерживаться до сентября 2022 года. Вы можете установить любую другую версию JDK на ваш вкус, используя эту инструкцию.
Как установить JDK
Скачайте нужный дистрибутив JDK
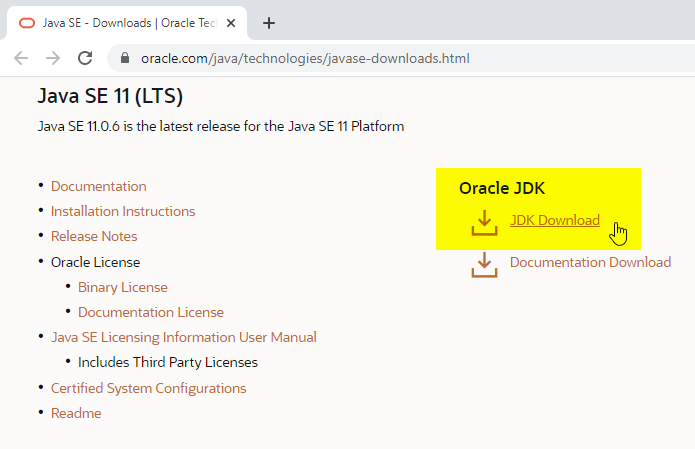
На следующей страницу выберите дистрибутив «Windows x64 Installer»:

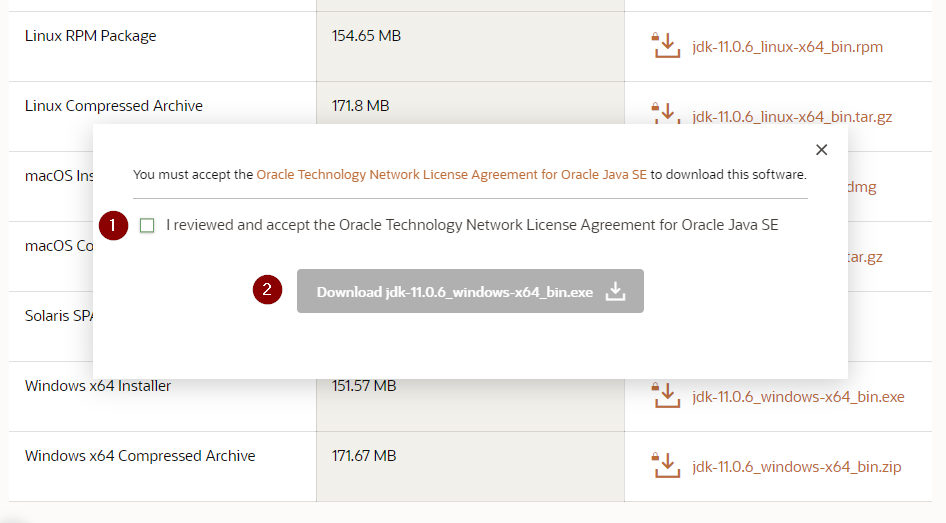
Появится всплывающее окно. Согласитесь с условиями лицензии и нажмите кнопку Download:
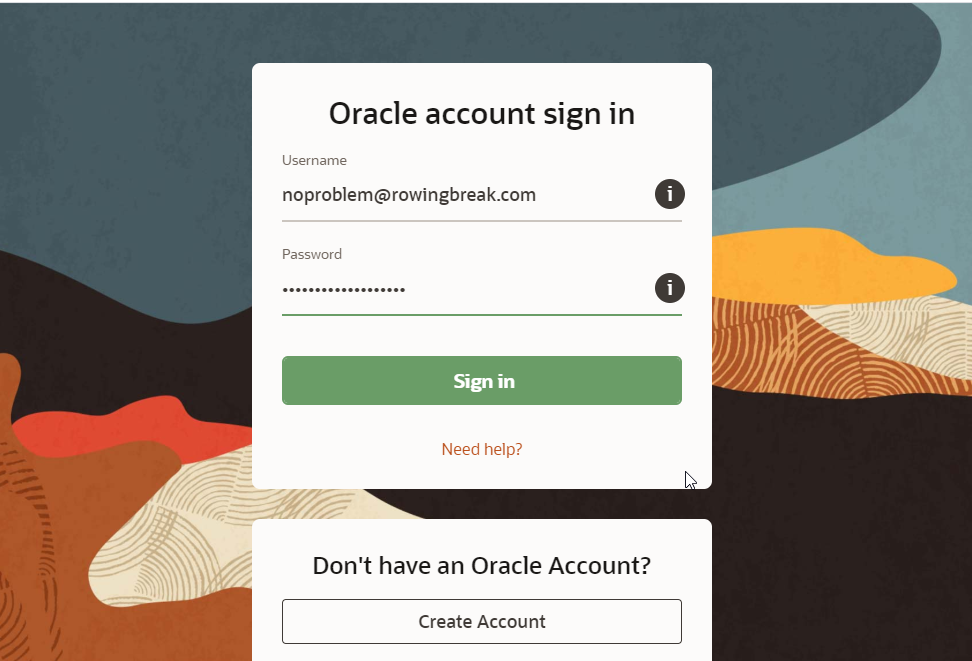
Для скачивания вам потребуется залогиниться в существующую учётную запись Oracle. Если у вас её нет, вы можете создать новую учётную запись.
Если вам лень заморачиваться с созданием учётных записей, найдите работающий логин/пароль на сайте bugmenot
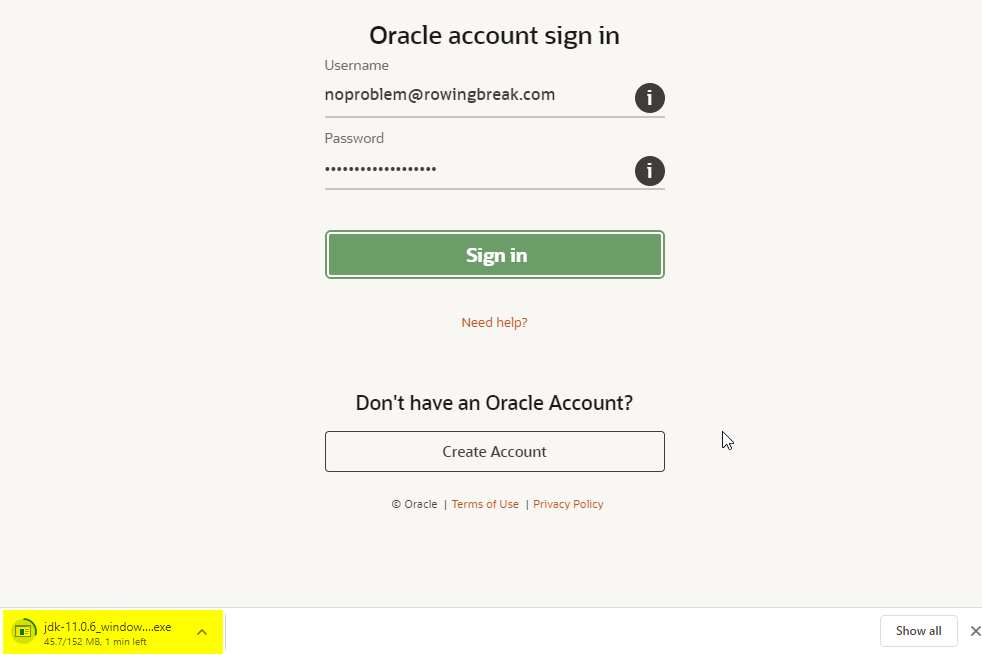
Начнётся скачивание инсталлятора. По окончанию загрузки запустите установку:
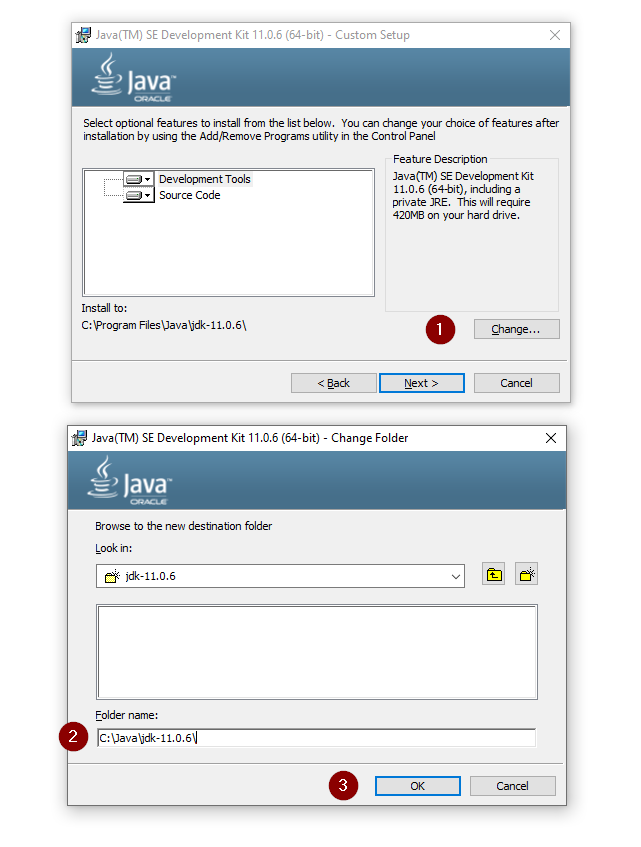
На этапе выбора компонентов укажите путь установки. Я крайне рекомендую вам заменить стандартный путь C:\Program Files путём, не содержащих пробелов, например, C:\Java\jdk-11

Через несколько минут установка завершится:

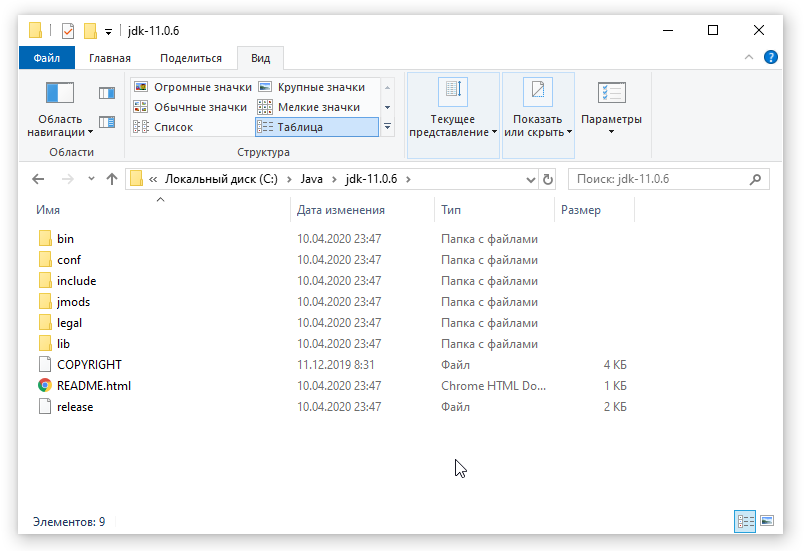
Для проверки вы можете зайти в указанный вами путь и проверить, что там есть следующий контент:
Настройка переменных окружения
После успешной установки JDK, крайне желательно объявить переменную окружения JAVA_HOME. Эта переменная используется многими программами и инструментами из стандартного набора Java разработчика.
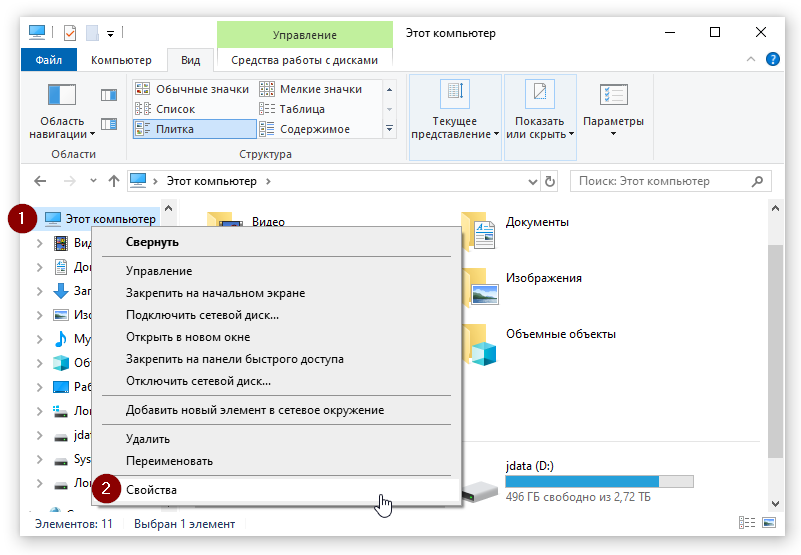
Для этого откройте окно «Этот компьютер» → «Свойства»:
Затем откройте окно «Дополнительные параметры системы» и в нём нажмите кнопку «Переменные среды…»

В окне «Переменные среды» нажмите кнопку «Создать…»

В появившемся окне введите следующие значения:
Имя переменной: JAVA_HOME
Значение переменной:

Затем найдите системную переменную Path и измените её:
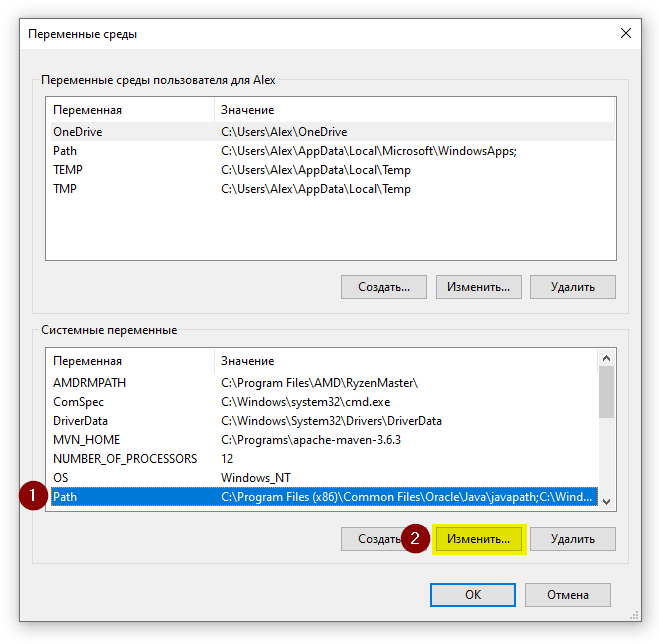
Нажмите кнопку «Создать», и укажите в новой строке значение %JAVA_HOME%\bin

Также, если вы видите в этом списке путь к программе javapath (как на скриншоте), удалите его.
Проверка установки
После установки переменных окружения откройте консоль (Win+R, cmd)

Последовательно выполните две команды:
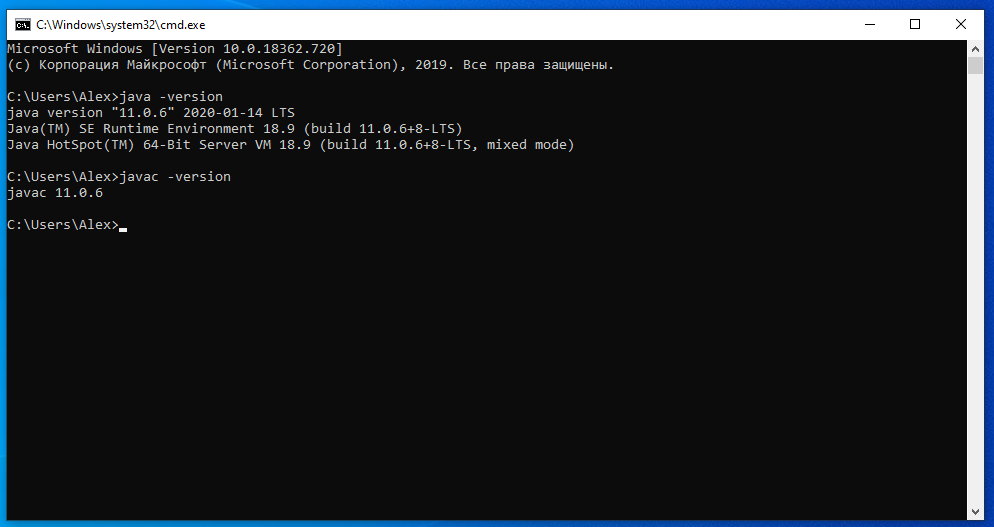
Если вы видите вывод наподобие этого, значит, вы корректно установили JDK и правильно указали переменные окружения. Вы готовы написать свою программу на Java!
Резюме
В данном уроке мы научились устанавливать JDK и настраивать перменные окружения. В следующих уроках мы установим основные инструменты Java программиста.
Как установить java development kit на windows 10
This topic includes the following sections:
System Requirements for Installing the JDK on 64-Bit Windows Platform
JDK Installation Instruction Notation for Windows
For any text in this document that contains the following notation, you must substitute the appropriate update version number:
JDK Installation Instructions for Windows
You run a self-installing executable file to unpack and install the JDK on Windows computers.
Install JDK on Windows computers by performing the actions described in the following topics:
Downloading the JDK Installer
Verify the successful completion of file download by comparing the file size on the download page and your local drive. Alternatively, you can ensure that the downloaded file’s checksum matches the one provided on the Java SE Downloads page.
Running the JDK Installer
During installation, the following files are copied to the location mentioned:
Alternatively, you can run these executables directly from the JDK’s bin directory.
Installing the JDK Silently
Instead of double-clicking or opening the JDK installer, you can perform a silent, non interactive, JDK installation by using command-line arguments.
Beginning to Use the JDK
Use the Java Development Kit in the Windows Start menu to access information related to Reference Documentation.
During JDK install, Java menu items are added to the Windows Start menu to provide easy access to Reference Documentation, which is online documentation web page.
During JDK installation and uninstallation processes, the appropriate start menu items are updated so that they are associated with the latest JDK version on the system
Uninstalling the JDK on Windows
Uninstalling the JDK in Silent Mode
You can use the command line for uninstalling the JDK.
For example, to uninstall JDK 11, run the command:
Windows Installer dialog appears prompting you for confirmation. Click Yes to uninstall JDK.
Finding the JDK Registry Key and UninstallString Value
Under the Uninstall folder, you will find many registry entries within curly brackets.
Highlight Uninstall folder before performing search for a particular registry.
The registry key is highlighted on the right-hand side of the pane and values of various uninstall strings are displayed on the left-hand pane.
JDK Installation Troubleshooting
The following sections provide tips for resolving issues, if any, while installing JDK.
System Error During Decompression
Program Cannot Be Run in DOS Mode
Open the MS-DOS shell or command prompt window.
Right-click the title bar.
Select the Program tab.
Ensure that the item Prevent MS-DOS-based programs from detecting Windows is not selected.
Exit the MS-DOS shell.
Restart your computer.
Characters That Are Not Part of the System Code Page
A 1722 error may occur if the installation directory is not part of the system locale’s code page. To prevent this, ensure that the user and system locales are identical, and that the installation path contains only characters that are part of the system locale’s code page. User and system locales can be set in the Regional Options or Regional Settings control panel.
The associated bug number is 4895647.
Cleanup the Registry After a Failed JDK Uninstall
Sometimes, attempts to uninstall JDK through the Windows Add/Remove program leave behind some Java entries in the registry that are not fully removed. These left behind registry entries can cause problems in installing a new version of Java. The following are the methods to cleanup registry entries:
Program Install and Uninstall troubleshooter (Recommended Method)
Run the Program Install and Uninstall troubleshooter to repair the corrupted registry keys that prevent programs from being completely uninstalled, or blocks new installations and updates.
Manually edit the registry (Use this only if the Fix It utility does not work)
Incorrectly editing your registry may severely damage your system. You should back up any valued data from your computer before making changes to the registry.
Use the File->Export functionality of the registry editor to save the registry key before deleting. In case you deleted the wrong registry key, you can restore the registry from your saved backup file, by using the File->Import functionality.
To delete the registry key:
9 Installation of the JDK and the JRE on Microsoft Windows Platforms
This topic includes the following sections:
System Requirements for Installing the JDK and the JRE on 64-Bit Windows Platform
The JDK and the JRE have minimum processor, disk space, and memory requirements for 64-bit Windows platform.
Before installing the JDK or the JRE on your 64-bit Windows platform, you must verify that it meets the following minimum processor, disk space, and memory requirements.
Both the JDK and JRE require at minimum a Pentium 2 266 MHz processor.
Disk Space Requirements
Public Java Runtime Environment
When you install 64-bit JDK, then 64-bit public JRE also gets installed. The following table provides the disk requirements for the installed features:
| JDK | Installed Image |
|---|---|
| Development Tools: 64-bit platform | 500 MB |
| Source Code | 54.2 MB |
| JRE | Installed Image |
|---|---|
| Public Java Runtime Environment | 200 MB |
| Java Update | 2 MB |
On Windows 64-bit operating systems, the Java runtime requires a minimum of 128 MB of memory.
The minimum physical RAM is required to run graphically based applications. More RAM is recommended for applets running within a browser using the Java Plug-in. Running with less memory may cause disk swapping, which has a severe effect on performance. Very large programs may require more RAM for adequate performance.
JDK and JRE Installation Instruction Notation for Windows
For any text in this document that contains the following notation, you must substitute the appropriate update version number:
JDK Installation Instructions for Windows
You run a self-installing executable file to unpack and install the JDK on Windows computers.
Install JDK on Windows computers by performing the actions described in the following topics:
Downloading the JDK Installer
Verify the successful completion of file download by comparing the file size on the download page and your local drive.
Running the JDK Installer
Installing the JDK Silently
Instead of double-clicking or opening the JDK installer, you can perform a silent, noninteractive, JDK installation by using command-line arguments.
| Installation Scenario | Command |
|---|---|
| Install JDK and public JRE in silent mode. | |
| Install development tools and source code in silent mode but not the public JRE. | |
| Install development tools, source code, and the public JRE in silent mode. | |
| Install the public JRE in the specified directory C:\test in silent mode. |
Setting the PATH Environment Variable
It is useful to set the PATH variable permanently for JDK 10 so that it is persistent after rebooting.
The PATH variable is set automatically for the JRE. This topic only applies to the JDK.
If you do not set the PATH variable, then you must specify the full path to the executable file every time that you run it. For example:
The PATH environment variable is a series of directories separated by semicolons (;) and is not case-sensitive. Microsoft Windows looks for programs in the PATH directories in order, from left to right.
You should only have one bin directory for a JDK in the path at a time. Those following the first instance are ignored.
If you are not sure where to add the JDK path, append it.
The new path takes effect in each new command window that you open after setting the PATH variable.
The following is a typical value for the PATH variable:
JRE Installation Instructions for Windows
When installing JRE on Windows computers, you must select the JRE installer that is appropriate for your Windows system.
The 64-bit Windows operating systems come with a 64-bit Internet Explorer (IE) browser as the standard (default) for viewing web pages.
Install JRE on Windows computers by performing the actions described in the following topics:
JRE Proxy Settings and Authentication
To use the Windows Online Installer, you must be connected to the internet.
If you are running behind a proxy server, then you must have your proxy settings correctly configured. If they are not configured, or are incorrectly configured, then the installer will terminate with the following message:
The installer cannot proceed with the current Internet Connection settings.
Please visit the following website for more information.
If you see this message, check your proxy settings:
If you do not know what the correct settings should be, check with your internet provider or system administrator.
Downloading the JRE Installer
The JRE Installer is located on the Java SE Runtime Environment 10 Downloads page.
The following JRE installers are available for you to download:
The Windows Offline installer and Windows installer contains everything that is required to install the JRE.
The Microsoft Windows Installer (MSI) Enterprise JRE Installer is also available, which enables you to install the JRE across your enterprise. It requires a commercial license for use in production.
Running the JRE Installer
Windows Registry Settings
The installation program for the Microsoft Windows version of the Java SE Runtime Environment uses the registry to store path and version information.
It creates the following registry keys:
JavaHome : the full path name of the directory in which the JRE is installed
RuntimeLib : the full path name of the Java runtime DLL
HKEY_LOCAL_MACHINE\Software\JavaSoft\Java Web Start\
This key is created for Java Web Start.
The registry layout for this example is:
The @CurrentVersion is a registry string in the «JDK» or «Java Development Kit» key.
For the same example, if the JRE is installed, then the registry layout is:
The @CurrentVersion is a registry string in the «JRE» or «Java Runtime Environment» key.
Beginning to Use the JDK
Use the Java item in the Windows Start menu to access essential Java information and functions, including Help, API documentation, the Java Control Panel, checking for updates, and Java Mission Control.
Java Start Menu Installed by JDK
During JDK install, Java menu items are added to the Windows Start menu to provide easy access to Java resources and a Java Development Kit folder is created in the Windows Start menu, which contains the following items:
Reference Documentation : Opens the Online API documentation web page.
Java Mission Control : Opens the Java Mission Control profiling and diagnostics tools suite.
Java Mission Control is a commercial feature available to users with a Java SE Advanced license.
During JDK installation and uninstallation processes, the appropriate start menu items are updated so that they are associated with the latest JDK version on the system
Java Start Menu Installed by JRE
During JRE installation, Java menu items are added to the Windows Start menu to provide easy access to Java resources and a Java folder is created in the Windows Start menu, which contains the following items:
About Java : Opens the Java Control Panel with focus on the General tab. The tab displays the latest JRE version installed on the system.
Check for Updates : Opens the Java Control Panel with focus on the Update tab
Configure Java : Opens the Java Control Panel with focus on the General tab
Get Help : Opens the Java Help Center
Visit Java.com : Opens the Java Download page
During JRE installation and uninstallation processes, the appropriate start menu items are updated so that they are associated with the latest JRE version on the system.
Java Web Start
Java Web Start is an application-deployment technology that gives you the power to run full-featured applications with a single click from your web browser.
Upgrading from Previous Versions
If you have a previous version of Java Web Start, do not uninstall it. Uninstalling it will cause the download cache to be cleared, and all previously installed Java Web Start application data will have to be downloaded again. The new version will write over previous installations and automatically update browsers to use the new version. The configuration files and the program files folder used by Java Web Start have changed, but all your settings will remain intact after the upgrade because Java Web Start will translate your settings to the new form.
The only way to uninstall Java Web Start is to uninstall the JDK or JRE. Uninstalling the JDK or JRE will not, however, remove the cache for previous versions of Java Web Start. Previous releases have separate uninstallation instructions for Java Web Start.
You may see a misleading message if you do the following:
Download and cache a Java Web Start application with the JDK or JRE.
When you remove the application, you see an Uninstaller Error dialog box saying:
An error occurred while trying to remove Java-Application: name App. It may have already been uninstalled. Would you like to remove Java-Application: name App from the Add or Remove program list?
If you say Yes to this, then you will see another Uninstaller Error dialog box saying:
You do not have sufficient access to remove Java-Application: name App from the Add or Remove Program list. Please contact your system administrator.
To avoid seeing the misleading message, either press F5 or reopen the dialog box. Any Java Web Start application that was downloaded and cached with the JDK or JRE will no longer appear in the list of currently installed programs.
Java Plug-in
Java Plug-in technology, included as part of the JRE, establishes a connection between popular browsers and the Java platform. This connection enables applets on websites to be run within a browser on the desktop.
The Java Plug-in is automatically enabled for supported web browsers during installation of the JRE. No user intervention is necessary.
Option to Disable the JRE Out-of-Date Warning
When the installed JRE falls below the security baseline or passes its built-in expiration date, an additional warning is shown to users to update their installed JRE to the latest version. For businesses that manage the update process centrally, users attempting to update their JRE individually, may cause problems.
A deployment property, deployment.expiration.check.enabled is available that can be used to disable the JRE out of date warning. To suppress this specific warning message, add the following entry in the deployment properties file:
To disable automatic updates, on the Update tab of the Java Control Panel, deselect the Check for Updates Automatically check box.
Uninstalling the JDK on Windows
Uninstalling the JRE on Windows
Use either of the following ways to uninstall JRE:
Go to Add/Remove Programs utility in the Microsoft Windows Control Panel and uninstall the older versions of JRE.
Remove JRE using the online Java Uninstall Tool.
The Java Removal Tool is integrated with the JRE installer. After JRE 10 is installed, the Java Removal Tool provides the list of outdated Java versions in the system and helps you to remove them.
The Java Uninstall tool will not run if your system administrator specified a deployment rule set in your organization.
A deployment rule set enables enterprises to manage their Java desktop environment directly and continue using legacy business applications in an environment of ever-tightening Java applet and Java Web Start application security policies. A deployment rule set enables administrators to specify rules for applets and Java Web Start applications; these rules may specify that a specific JRE version must be used. Consequently, the Java Uninstall tool will not run if it detects a deployment rule set to ensure that no required JREs are uninstalled.
JDK Installation Troubleshooting
The following sections provide tips for working around problems that are sometimes seen during or while following installation instructions.
System Error During Decompression
Program Cannot Be Run in DOS Mode
Open the MS-DOS shell or command prompt window.
Right-click the title bar.
Select the Program tab.
Ensure that the item Prevent MS-DOS-based programs from detecting Windows is not selected.
Exit the MS-DOS shell.
Restart your computer.
Source Files in Notepad
Characters That Are Not Part of the System Code Page
It is possible to name directories using characters that are not part of the system locale’s code page. If such a directory is part of the installation path, then generic error 1722 occurs, and installation is not completed. Error 1722 is a Windows installer error code. It indicates that the installation process has failed. The exact reason for this error is not known at this time.
To prevent this problem, ensure that the user and system locales are identical, and that the installation path contains only characters that are part of the system locale’s code page. User and system locales can be set in the Regional Options or Regional Settings control panel.
The associated bug number is 4895647.
Windows Online Installation and Java Update FAQ
These are frequently asked questions about JDK 10 and JRE 10 online installation and Java updates on Windows computers.
1. I downloaded the installer and it is less than 1 megabyte. Why is it so small?
The Windows Online Installer for the JRE will download more installer files. Using this installer helps users to avoid downloading unnecessary files.
2. I had the Java Control Panel open for Java Update and the About tab showed the version of the JRE installed in my computer. Then I ran Java Update, and the version of the JRE that the Java Control Panel is showing has not changed. Why is this?
You need to close and restart the Java Control Panel to get the updated Control Panel.
3. Netscape/Mozilla is not working correctly with Java Plug-in. Why?
First, close all the browsers sessions. If this does not work, reboot the system and try again.
4. I try to install on the D:\ drive and Java Update is still installing files onto the C:\ drive. Why?
Regardless of whether an alternate target directory was selected, Java Update needs to install some files on the Windows system drive.
5. How can I uninstall the Java Update version that I just installed?
7. I found the jusched.exe process running in the background of my system after installing JRE. Is there a way to shut it down?
The jusched.exe is the scheduler process of Java Update. This process runs automatically. To shut in the Java Control Panel on the Update tab, deselect the Check for Updates Automatically check box.
8. When I click the Update Now button from the Java Control Panel, it complains about the system being «offline.» What does that mean?
Java Update can be run only if the system is connected to the network. A system that is not connected to the network is referred to as being offline. When the Update Now is clicked, it will check the online/offline status of your system. If your computer does not have internet access, then the error message is displayed. Check that your system is currently connected to the internet and try again.
9. I followed the instructions to install a specific version of the JRE. After the installation, a message is displayed from system tray saying an update is available for download. What should I do?
The message is part of the Java Auto Update mechanism, which detects at user login time if a newer version of the JRE is available for download. In the system tray, click the Java Update icon to download and install the update.
10. I encountered the error «This installation package could not be opened. Contact the application vendor to verify that this is a valid Windows Installer package.» when running the Java SE installer.
There are several possible reasons for this error to be displayed; a few are listed:
Network connection fails.
Download manager software interrupts the download process.
Another application, such as an antivirus application, may interrupt the installation process.
To address these problems, ensure that the third-party downloader applications are turned off and the network connection is configured properly. Also, if a proxy is in use, then ensure that the proxy authentication is turned off.
11. I encountered the error «Error 1722. There is a problem with this Windows installer package. A program run as part of the setup did not finish as expected. Contact your support personnel or package vendor.»
See Error 1722: Problem with Windows Installer Package. If you encounter any other errors or issues, then you can access Java Help Center, which contains solutions for issues that you might encounter when downloading and installing Java on your system. In particular, you can search for solutions by error number. Searching for «Error 1722» returns a solution to this issue.